Saturday, December 12, 2015

Holiday Party Glow: Anastasia Beverly Hills Illuminator in Starlight

I'm really sticking to that wishlist, you guys, and it's working for me - all of my purchases so far have been great successes, knock on wood! One of those is Anastasia Beverly Hills Illuminator in Starlight ($28 for 0.32 oz/ 9 g), a beautiful powder highlight in the 'gelee'/ MAC Extra Dimension type of formula. I'd never had a powder product with that texture before, so I was excited to play around with Anastasia's version.
I was also right to wait it out and see if Anastasia's own website would have any Black Friday/ Cyber Monday deals on this product, and while the sale wasn't super amazing, I managed to get my Starlight plus their A23 Highlighter brush (pictured) in a set for $26 with free shipping. I'm not going to review the brush right now - first impressions are that it isn't anything special - but still, the combo was just a little bit cheaper than the full price of one Illuminator.
I've read somewhere that the Illuminator's packaging looks cheap and doesn't go well with the rest of Anastasia's make-up line, but I don't really find any problems with it. Sure, it's just black plastic, but it seems sturdy and comes with a large mirror inside the compact.
Word on the street is that the pretty art deco-inspired embossing on the powder was chosen not just for visual impact, but for how increases powder pick-up on the brush. Hmm, maybe - I haven't really noticed anything different about that, but then again I normally use a very soft highlighter brush (Zoeva 105 Luxe Highlight, here) that allows me to precisely control the amount of product on the bristles. Either way, I think it's a beautiful design that adds a special something something to this highlighter.
Now, as for the gelee formula... I guess if I wasn't told before that it was a special type of formulation, I probably wouldn't have noticed all that much - sorry. The product is pressed quite firmy in the pan, which I like as it diminishes the amount of fly-away dust all over the compact like in the other two powder highlighters in my stash. Despite that firmness, it's easy to pick up quite a bit on the brush, and it's nicely pigmented - definitely not sheer, but not fully opaque either (that would be terrible for a luminizing product, don't you think?). Anastasia's Illuminator has a nice slip to it as well, which makes blending out a breeze - it definitely feels creamier/ less dry than my two baked highlighters, shown below for comparison.
The other significant difference between Anastasia's powder highlighter and the other two that I own is that the Illuminator has a lot more, well, glow to it. It's more reflective, and when applied heavily, can even verge on that metallic/ wet look that I usually avoid. However, it doesn't exaggerate pores too much, and it's quite easy to sheer out for daytime, so I'm happy to at least have the option of a heavier highlight if I want - it'd be really pretty for a Holiday party look, for example.
As for the shade, Starlight is the perfect highlight for fair to light skintones. I've heard it described two ways - either as a very pale white gold, or as a very pale pink, which seemed quite confusing to me; is it warm or cool-toned then? Well, it's a little bit of both. In artificial lighting, it definitely has more of that white gold iridescence, but in daylight, I see more of the baby pink, so I believe it's a white gold/ pale pink duochrome on a white base. Either way, I would describe its tone as neutral, so it should suit a variety of lighter skintones - it also compliments just about any blush shade. Compared to my other highlighters, Laura Mercier Baked Powder in Highlight 01 (click) is more champagne/ beige, while Makeup Revolution Vivid Baked Highlighter in Radiant Lights (click) is significantly darker and more peachy pink. I'm sorry these swatches are not more visible, but truth be told all three of these products are rather close to my skintone.
L-R: (far left) Anastasia Beverly Hills Illuminator in Starlight blended out, then swatched heavily, Laura Mercier Baked Highlight 01, Makeup Revolution Baked Vivid Highlighter in Radiant Lights
I took a whole bunch of face shots to try and show you Starlight in action, but I think winter afternoon light isn't bright enough to pick up on the glow - the only thing it managed to pick up on was my dry and flaky skin (I also didn't apply the Illuminator heavily on my cheeks because I was heading out to work). You can see it concentrated more in the inner corners of my eyes, but uhm, yeah - well I guess this picture shows that you really can apply this highlighter more sheer and subtle for daytime.
Anastasia's Starlight rounds up my powder highlighter collection very nicely, and I'm happy that I pulled the trigger on it. I really love all three of the luminizing powders I now have in my stash, and I don't think I'll be adding another one any time soon - I feel that three is a really good number to have some variety but still be able to regularly use all of them. What was the last powder highlighter that you've bought? How many do you have in your stash?

Wednesday, December 9, 2015

Vanity Tour: My Current Make-up Collection and Storage

I've been spending a lot of time lately talking about downsizing, simplifying, editing and curating my capsule make-up collection, but so far I haven't actually had the guts to show you what my current beauty stash looks like - maybe because, uhm, I wouldn't actually consider it a capsule. Just like my wardrobe, it isn't a capsule in terms of only having a small number of pieces you wear over and over again; although I kinda do that anyway by committing to the products in my Project Pans. I'm absolutely aware that my stash is way bigger than what an average woman would need to make her face up, because you know, I used to be that average, non-beauty obsessed woman with just a single make-up bag to house all of her product - imagine that!
However, make-up is my passion, and I get excited when I have an above average amount of products to rotate and play with - but what I'm trying to achieve is ensuring that every single item in my stash is loved and used on at least a somewhat regular basis. If it's not, I need to pass it on; I guess that's how I would define the goal for my capsule collection, which is a constant work in progress. I figured that it could be helpful to show you exactly how much I have (well, visually - I'm still not ready to do a numerical inventory), and how I store it, and maybe show you my collection again in a year's time. So, are you ready to virtually tour my vanity?
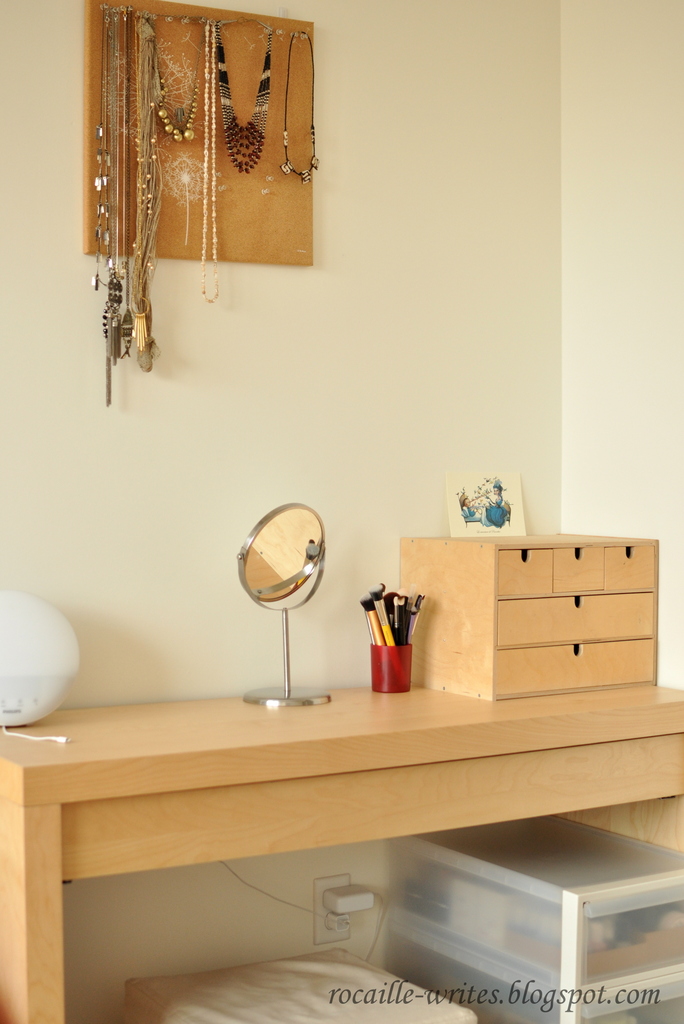
The vanity table itself is a popular IKEA Malm model I purchased around 4 years ago, and it's held up reasonably well - although the bottom of my drawer warped under the weight of things I was storing in it, and I have to be very careful with it now. The little chest of drawers on top is also from IKEA from around 6 years ago, I believe it's been discontinued. The plastic drawers under the table are from The Container Store, but I don't keep any make-up products there; I use them for back-up skincare, as shown in this post, nail polish (would you like to see that in a future post?), and my husband's out of season shoes, lol. The only two things I keep out on my counter is a simple mirror (again, IKEA) and my daily brush cup.

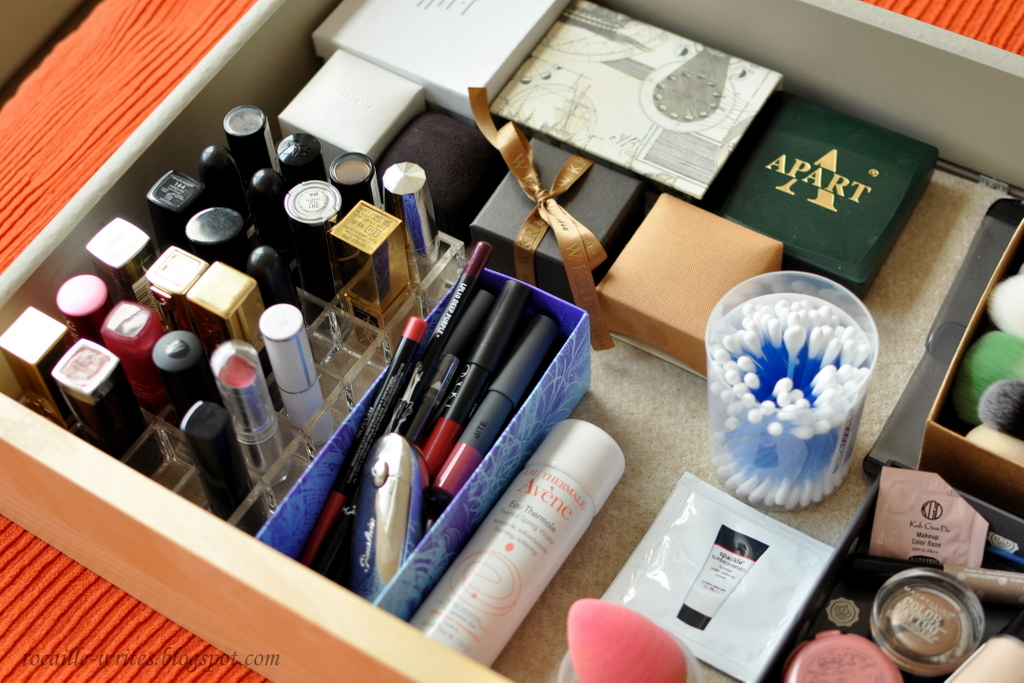
Let's start with the large drawer, since it mostly houses products I use on a daily basis - my biweekly/ monthly make-up basket, if you will. Anyone who's ever owned one of these IKEA vanities knows that this drawer has a VERY significant drawback - it only opens about halfway, which means that accessing the back of the drawer is a *tad* difficult (which is also why I had to take out this entire drawer and lay it on my bed to be able to show you the contents more clearly). I use the back portion to store rarely reached for things: my silver and gold jewelry, extra brushes I'm not using currently (I like storing them flat in a drawer as they get a lot less dusty than in a cup),  back-up/ not yet opened make-up (I'm working on emptying that box entirely and freeing some space there), and lastly some costume jewelry - all of the clear acrylic organizers are from The Container Store.


In the front of the drawer starting on the left, I store all of my lipsticks upright, roughly organized by color families, as well as a TATCHA box full of fat lip crayons and a few lip liners - well, the Guerlain space tampon doesn't fit into my lipstick organizer, so it's in there too. Next, we have cotton buds, Avene Thermal Water Spray to dampen brushes or mist my face, and my daily essentials in a little box; these are mostly products from my Project Make A Dent/ Project 10 Pan.
Next, I put aside some space in my jewelry organizers to display some more of my make-up stash: all of my pencil eyeliners, and some vertically organized compacts I'm currently using; a few powder blushes, a bronzer, a highlighter, the YSL Blur Perfector. The smaller compartments help to separate the lipsticks I'm using now. The last compartment on the left that's not filled with costume jewelry is meant mostly for smaller eyeshadow palettes I'm playing with at the moment. And that's everything in my vanity drawer!

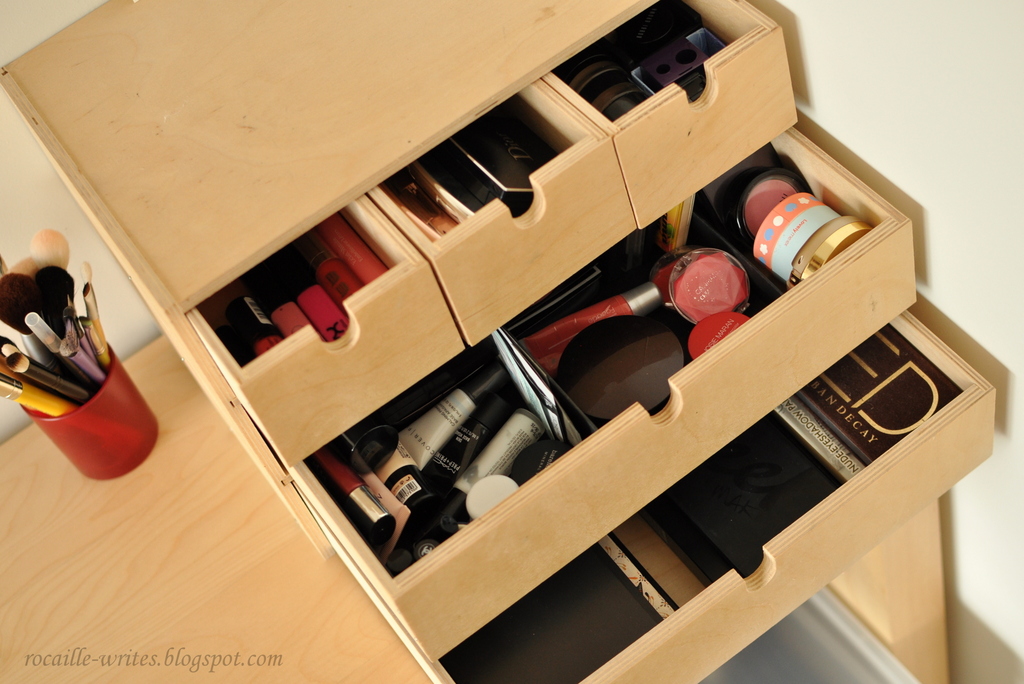
Moving swiftly along to the small chest of drawers on the counter, it has three narrow drawers on top and two wider drawers in the middle and on the bottom. The top left drawer houses all of my lipglosses, liquid lipsticks/ stains and lip balms in the back. The small middle drawer has single eyeshadows towards the back, but mostly eyeshadow quads, quints and two bareMinerals READY 8.0 palettes, organized vertically. I've put all of my cream eyeshadows, both in glass pots and sticks, in the top right drawer, as well as random bits and bobs like eyelash glue, sharpeners, Inglot Duraline and eye primer samples.
The wider middle drawer houses face products: foundations, BB creams, face primers, setting powders and highlighters mostly in the box on the left, cream and powder blushes and bronzers on the right - I've shown you this drawer more close-up in my Addicted to Blush Tag post here. I organized all of my larger eyeshadow palettes (both pre-made and freeform like Z-Palettes) in the bottom drawer; you can see all of my eyeshadow palettes in more detail in this post, although I've since downsized some of the palettes shown there.
Phew! Well, I guess this post isn't quite as long as I was expecting, though it's certainly quite picture-heavy. Looking at the photos, my drawers seem a bit cluttered, but day-to-day and for my personal use, I find this set-up very practical and easy to navigate. Please let me know if you have any questions, or if you've spotted something you'd like me to discuss in more detail in a separate post - I'd be happy to oblige. I have to admit that I'm quite satisfied with my stash right now; I'm planning to use up some more products in the next year, but there are also things on my wishlist I would like to try, so I'm not sure how much further I can reduce my stash without giving or throwing stuff away - and I don't really want to declutter anymore, at least not to the extent I've been doing it this year. I hope you enjoyed this glimpse at my make-up collection and storage, and let me know your thoughts in the comments!

Sunday, December 6, 2015

Getting Into The Christmas Spirit

Happy Saint Nicholas Day! In case you didn't know, today is the feast day of St. Nicholas, a 4th-century Christian bishop with a reputation for secret gift-giving such as slipping coins into the boots of the poor. Growing up in Poland, I used to put my winter booties out for Saint Mikolaj on the night of December 5th, hoping to find toys in them the next morning (and yes, I would still get my bigger presents on Christmas Eve - it's a win win, am I right?). So I guess this little coincidence now allows me to shamelessly talk about the holidays with you and share what's been on my mind lately.
Christmas is my favorite holiday, like it is for probably 98% of Christians. I have a special fondness for things associated with it, and I'm not really apologetic about it - there's so much hate and sadness in our world that I can't help but feel grateful for those little joys Christmas usually brings me. Twinkling lights. The smell of cold and winter in the air. Baking shortbread star cookies. The feel of fir and spruce branches in my hands. Even the gaudy decorations and glittery baubles. It's fun!

But this year, I'm not really feeling it *shrugs*. I believe it's a whole combination of feelings I've been experiencing lately, and I wish that maybe by naming, stripping them bare and sending them out in the world like itinerant snowflakes, I can get rid of some of my Holiday blues. Shall we try?

Regardless of those superficial moments of festive joy I've mentioned above, Christmas is the happiest time of the year for me because of my family. As some of you may know, me and my husband emigrated to North America over 6 years ago, and all of our family and most of our friends live in Poland. We go home for the holidays every year, and due to my husband's limited time off work and the cost of airfare it's the only time of the year we travel to Poland (although most years, we also see our immediate family when they visit us here in the US during summer months).

At any rate - I don't know about you guys, but my family is pretty high on my life's priority list. This combined with how rarely we get to see them makes Christmas extra special for me. And I'm not saying this year I'm not excited and looking forward to being with our loved ones - but I guess this year more than in the past I feel that our time together is just so limited. Unfortunately, parting doesn't get easier with practice, and every year when time comes to say goodbye for another six months or more, I'm simply heartbroken. I can't seem to be able to shake that feeling this past couple of weeks, and I don't want to think about our Christmas trip's end before it's even begun, but that's precisely what I'm doing.

Another big factor that's been adding to my Christmas ennui is, well... excess. You've surely noticed I've been talking quite a bit about minimalism on the blog this year, not because it's trendy but because many of its ideas are really resonating with me. For someone wishing to simplify their life, the Holiday season seems to be all about things that you must have and that you must do. Shopping for gifts, and shopping holiday sales. Buying the tree and tree trinkets, decorating the house. Christmas party obligations and associated stresses - hair, outfit, hostess gifts. Cooking and baking up a storm. That's a lot of things we may feel forced to do, without reflecting on their value in our lives.

I would say that compared to a standard American family (if such a mythical beast even exists), me and my husband have always been pretty minimalist when it comes to celebrating the season - partly because we can easily simplify as we're spending the holiday overseas. We don't put up a Christmas tree; it'd be a shame to have it go to waste when we're not home for two weeks. I don't decorate our home much, because we live in a small apartment and don't have the space for all the extra stuff. We usually go to one semi-formal holiday party, and we don't keep a large circle of friends we would feel obligated to entertain. I don't even send out holiday cards. I'm the beauty blogger who stole Christmas, am I not?

Yet even the small number of Christmas preparations give me very ambivalent feels. On one hand, I feel incredibly grateful to have the means to purchase nice gifts for everyone in my family. But on the other... I kinda wish we would skip the whole gift exchange. There's 12 people on my list, no kids. It has somehow transpired over the years that I always buy more than one gift for each person - more like two or three. That's at least 30 (?!) different things I'm having to carefully plan and research, purchase in advance, transport in my check-in luggage to Poland, wrap and place under the tree. It takes a lot of time, effort and energy - and money, of course. But what worries me the most is that in the end, I'm really not sure how useful or enjoyable these presents will be for my recipients. As for me, when it comes to surprise gifts, I've come to feel more apprehensive than excited when it's time to open the boxes under the tree, because I HATE receiving unwanted things and feeling ungrateful and wasteful as a result. And for the things that I've requested from my wishlist... I could just as well purchase them myself, couldn't I? It's really starting to feel like the whole gift thing isn't really worth it - for me.

Before you judge me as a bit extreme, I should tell you that I do believe it's okay to live a little during the holiday season. I think we should be feeling thrilled about Christmas indulgences, precisely because they're not strictly necessary. It's so much fun to experience things that are over and beyond - that's what makes them extra special, and we're all very priviledged to have that. Maybe it doesn't sound very minimalist to say that anticipating excess can make us happier, but, well, it's true - and I think that as long as we don't make ourselves feel completely overwhelmed and stressed out, it's all good.

So how am I attempting to fight the blues and get into that Christmas spirit? Well, now that I'm 95% done with buying gifts, I did decide to go ahead and purchase a few new clothing items for myself during Cyber Monday sales (I've never shopped Black Friday in store, but I did work retail on Black Friday one year, and it wasn't pretty). Some pieces will replace somewhat worn out staples (a few warm long-sleeved tops, a set of pjs), some are just for fun (a casual jersey dress) - and I'm looking forward to wearing them during the Holidays.
I'd also been contemplating the best way to inject a little bit of Christmas decor into our place, and I was inspired partly by my mom, partly by my fall-themed pumpkin centerpiece shown here, to put together this little arrangement for our living room window sill - it's my version of decorating the mantelpiece when you don't own a fireplace. I decorate our window with fairy lights every December, but this year I shopped around and purchased a bunch of these fir? or spruce? branches for a whopping sum of $2 at a nearby florist. Greenpoint, I tell you - and speaking Polish to Polish shopkeepers doesn't hurt either :) The branches smell absolutely incredible, and since they're just, well, branches, they can be easily composted at the end of the season without having to store another thing in the closet. I laid them out on our sill, added some baubles I had in my stash from that one year we did put up a tree, and voila! A touch of minimalist Holiday cheer.

Other things on my list include baking festive cookies, listening to Ella Fitzgerald's holiday album (well, okay, I'm also partial to some Buble), typing out emails to friends all over the world I usually have trouble keeping in touch with, gorging on tangerines and maybe even watching a seasonal movie or two (please leave your favorites in the comments below!). I also borrowed an easy Christmassy read from my local library - they always set up seasonal displays for kids, but I guess this time they were nice enough to put together a little corner for adults too. Christmas-time mystery seems to be a thing, and I like it. So... are you guys feeling the Christmas spirit already, or are you trying to fight the blues like me? What are you looking forward to the most during the season? I'd love to hear from you!

Thursday, December 3, 2015

Make-up Investment Piece: Surratt Artistique Cheek Brush Review

I did it - I bought one thing and one thing only from the latest Sephora VIB sale, and it's this Surratt Artistique Cheek Brush ($115 each). When I first laid my grubby little fingers on Surratt's brushes last year at their launch (read my initial thoughts here), I was the most impressed with the large Powder brush and it's smaller companion, the Cheek Brush. I have a thing for blush brushes, and Surratt's version with its silky soft bristles and cute pom-pom shape beckoned to me from the counter. BUT! But. This beauty comes at a price.
It's easy to see the reason behind investing in quality versus quantity when it comes to your possessions, but I find it's another thing entirely to actually act upon it. In the past, I would have never dreamt of spending over a hundred bucks for any make-up product or tool; I'd be thinking, 'how life-changing would it have to be to justify the price tag?'. Truth is, very few things in life are game-changers, and I personally wouldn't classify anything make-up related among them. However, I do see the value in supporting genuine craftsmanship, something that's becoming rarer and rarer these days - so I bought this beautiful handmade Japanese brush, and it gives me joy to use it every day. Was it necessary? No. If you'd hate to part with your hard-earned money for just this one little object and later nit-pick why the brush isn't the most perfect tool in all of creation, don't do it. It's not worth it.
As soon as you hold the box with your precious Surratt brush, you can see and feel where your money has gone: there's minute attention to detail and luxurious elegance in the presentation of this brush. I know some of you would probably rather pay a lower price and just get the brush, but that's never an option with high-end make-up, is it? In the past, after a few months of procrastinating the painful decision, I tossed the box that my Medium Smokey Eye Brush (review) came in, but now I kinda regret it - I could have used it for jewelry (the length would be perfect for bracelets or necklaces), or to organize make-up in my narrow drawers, like I did with this box. You can also see I've reused some boxes from my TATCHA skincare; they too are too pretty to discard.
But, back to the Cheek Brush. Do I even need to comment on how amazingly soft Surratt's brushes are to the touch? I believe the bristles are grey squirrel, and like most Japanese-made brushes, they haven't been cut to create the brush's shape but hand-selected instead, so the hairs taper down and feel even softer on the skin. If you've never seen Surratt's brushes in person, the handles are a bit on the shorter side, which I like for applying make-up on myself. The glittering ombre detail at the end of the handle has stood the test of time on my other Surratt brush through a year of use and brush laundry.
Another important fact you need to know about this brush is that's it's SMALL.  I have included a photo of it resting in my hand for size reference - I hope that you can see that it's without a doubt rather diminutive for a blush brush. If you're a fan of something like Real Techniques Blush Brush, the Surratt is not for you. If, however, your face and features are on the small side and you like to be able to carefully control your blush placement, this is a fantastic specimen.
I didn't have any other blush brushes similar in size or shape to compare, because the Surratt Cheek Brush is in fact closer in size to my highlighter/ contour brushes - a little larger and denser, but still. You can see here that the domed shape is comparable to the Real Techniques Contour Brush, but the Surratt has longer bristles (= more flexibility) and doesn't fluff out as much. It does become a bit rounder as you use it (it's freshly washed in my photos) but definitely not enough to try to 'stipple' your powders on. Compared to the Zoeva 105 Luxe Highlight, there's no taper to Surratt's bristles, and there's definitely a lot more bristles packed in the ferrule.
I've been using this brush for close to two weeks now and I do enjoy how it applies my blush. The density of the Cheek Brush allows it to pick up quite a bit of pigment from the pan, but it's flexible enough to blend everything out seamlessly. I usually use one side to place the powder on my cheeks, and then I swirl it around using the head to diffuse it around the edges. The first time I used it I was surprised to see two hairs stuck to my cheek, but I believe it must have been just some loose hairs left over from the manufacturing process as I haven't noticed any shedding since - also, no shedding on my Smokey Eye Brush.
L-R: Surratt Cheek Brush (squirrel), Zoeva 105 Luxe Highlight (goat), Real Techniques Contour Brush (synthetic)
I'm very happy with this brush, and I'm glad I decided to splurge on it during the VIB sale (I'm also glad to see Surratt sold at Sephora, although Kar Yi (here's a link to her review of Surratt's angled Sculpting Brush) told me it's difficult to get any sense of his brushes' feel in Sephora store displays - much easier to play with the fluffies at Barney's). I can see this blush becoming a daily staple, be it for blush, highlighter or more precise setting powder placement. What have you picked up during recent sale events? What is your favorite brush to use for powder blushes?

Monday, November 30, 2015

Multi-tasking Base: Missha Perfect Cover BB Cream SPF42

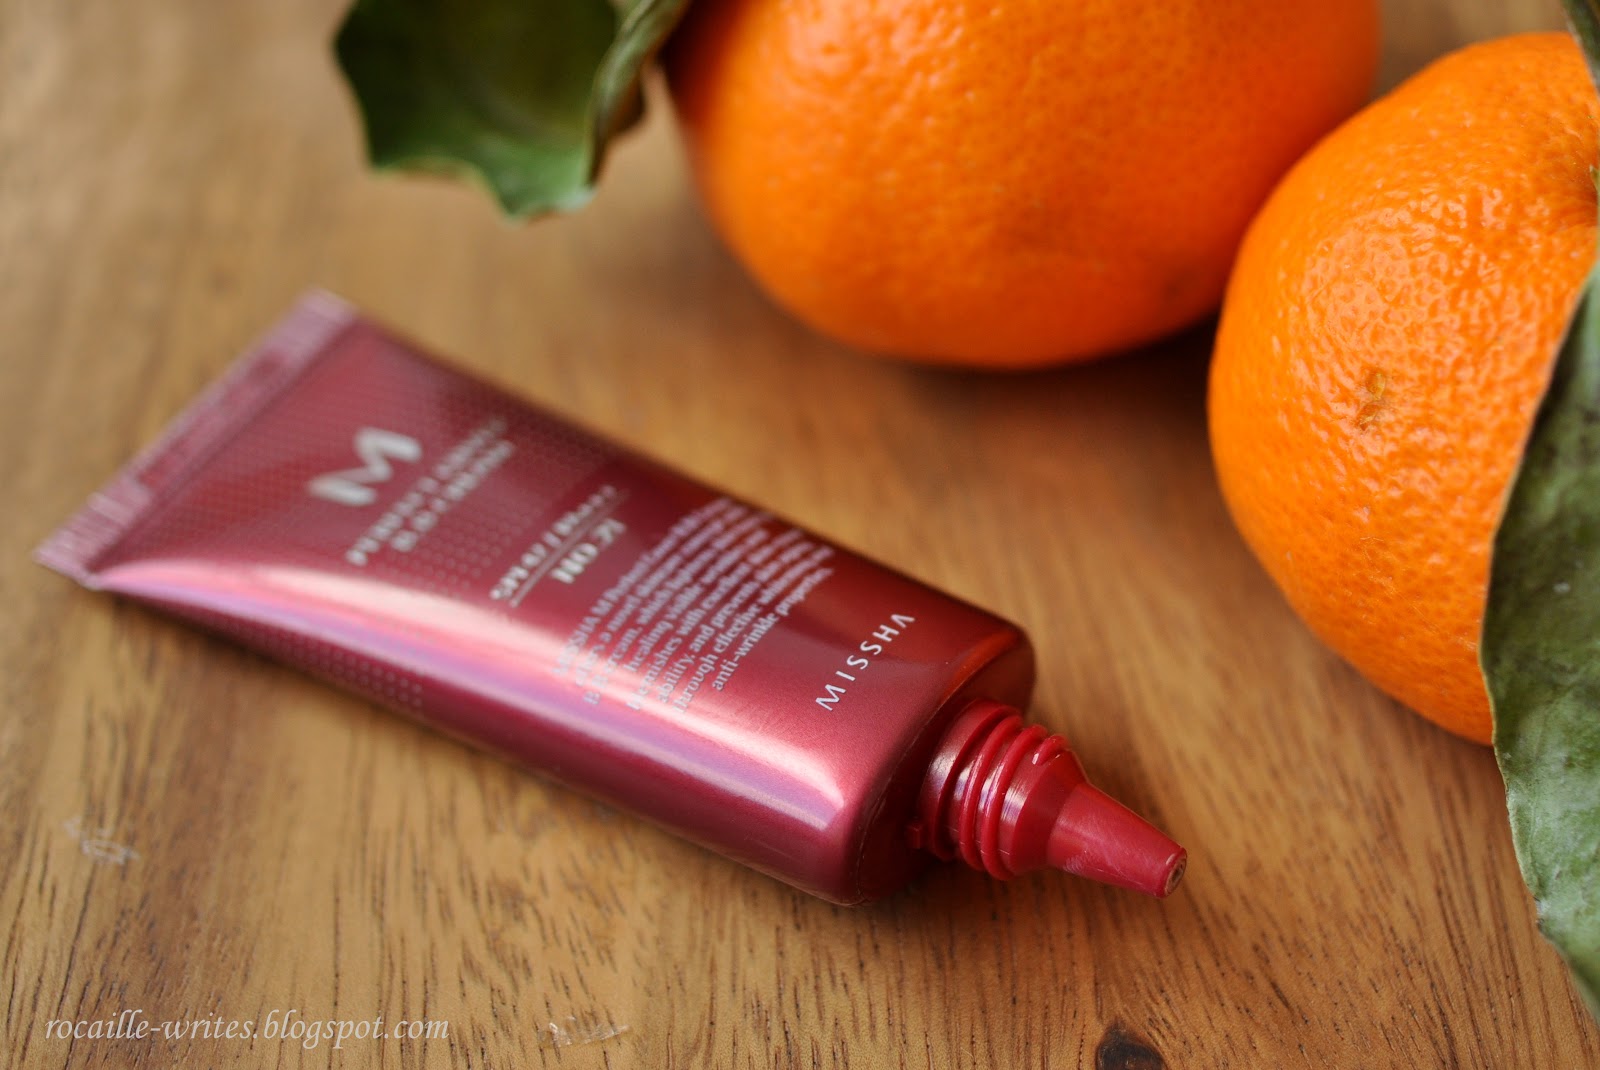
Missha was one of the first Korean brands to arrive on our beauty scene, and their Perfect Cover BB Cream SPF 42 PA +++ ($22 for 50ml but frequently on sale: entire Missha website is 40% off plus free shipping until midnight today) was one of the first products from the brand to win the hearts of many a beauty blogger. I purchased this smaller 20ml trial size in-store last year (don't you think all brands should offer smaller sizes of foundations for less? Such a great idea!) and I've only just dug it out from my back-up stash to try now.
Missha's BB Cream comes in a simple cardboard box with a full list of ingredients (although surprisingly, the sunscreen content is not listed separately as an active ingredient, which I believe is required by law here in the US), and the product itself is packaged in a slim squeeze tube, which I always appreciate. The claims for this BB Cream are 'natural-looking coverage while providing sun protection, treating dark spots, and preventing wrinkles', and it can be used either as a primer or alone as a foundation.
The texture of this product is a slightly thicker lotion that spreads and blends out easily on the skin. It does have quite a strong fragrance - it smells like a cross between old-school Nivea and sunscreen to me, kinda nostalgic - and it can linger, so I would advise against purchasing this BB if you're sensitive to scents. The Perfect Cover BB definitely has a more emollient, moisturizing feel as it contains mineral oil as well as natural plant oils, glycerine and hyaluronic acid, but I wouldn't say it feels heavy or tacky once blended in. The coverage is light (a bit surprising given the product's name, but in line with the brand's claims) and it has a natural, glowy finish on the skin. This BB Cream doesn't pool into my fine lines or pores, but due to the dewy effect, it doesn't disguise them either.
Compared to the L'Occitane Immortelle Precious BB Cream that I reviewed not too long ago, on my combination skin, I definitely prefer the Missha Perfect Cover because of its better longevity and more lightweight feel (I didn't include the L'Occitane BB in the swatches as I've already passed it on to a drier-skinned friend). I'm not surprised that Perfect Cover is one of Missha's best-sellers - it would be a fantastic multi-purpose product for someone looking for just a little bit of coverage to even things out but with the added conveniance of not having to layer a separate SPF or even moisturizer under one's foundation in the morning. One thing to keep in mind is that this product has a tendency to leave a bit of an ashy cast on the skin (probably due to high zinc oxide content); the shade I chose, Light Beige no. 21, can look a bit grey on my skin if applied more generously.
L-R: Missha Perfect Cover BB in no. 21 Light Beige, Revlon Colorstay in Ivory, Koh Gen Do Aqua Foundation in PK-1
All in all, I'm quite happy with Missha Perfect Cover BB Cream. Most days, the coverage is a bit too light for me, but I've also been mixing it in with a more longlasting and opaque foundation, and I like the effect. I also really enjoy wearing Missha's BB when my skin is particularly dry and dehydrated (hello, winter season!), although it doesn't have any miraculous properties like erasing flaky skin - it just feels more comfortable than a mattifying base. What foundation do you usually reach for once the weather cools down? Do you prefer to layer SPF with foundation, or do you rely on sunscreen in your base products?

Thursday, November 26, 2015

A Pillow For Your Under Eyes: Laneige Cushion Concealer SPF30 in Light*

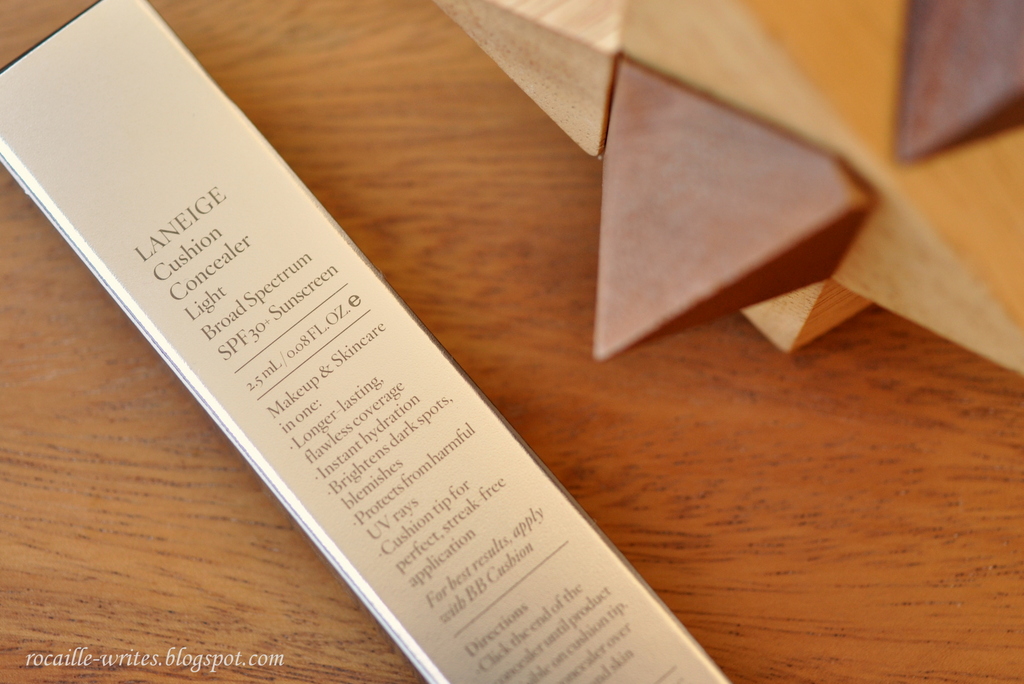
With the increasing popularity of cushion foundations (read my review of Laneige's BB Cushion here), many brands have decided to go all out on the cushion technology, introducing cushion blushers, gel eyeliners, eyeshadows and more. Laneige is definitely on top of that trend with their Cushion Concealer Broad Spectrum SPF 30* ($20 for 2.5 ml at Target), available in Light (which I have here to show you) and Medium.
First off, I have to say that Laneige's Cushion Concealer doesn't actually have a cushion - the applicator is in fact a soft fluffy... ehm, ball, I guess. Or round doe foot. It looks pretty adorable when brand new with its baby pink color. The delivery method of this concealer is a clickety pen, and I absolutely love, love that there's a window on the side of the packaging so you can easily see how much product you have remaining. The concealer with the most similar packaging on the US market right now is the newly released Burberry Cashmere Concealer, while the Maybelline Age Rewind is a similar concept, but it features a sponge on the end and the size of the applicator is much larger. Laneige's doe foot fits perfectly into the curves around your eyes or nose.
The Cushion Concealer boasts SPF 30+ (combination of physical and chemical sunscreen ingredients), which is a rarity, as well as skincare benefits on top of its concealing action: it's supposed to have a hydrating and brightening effect. I was actually expecting the texture of this product to be much thinner, but in fact, it's quite creamy (only slightly thinner than my NARS Radiant Creamy Concealer), and blends easily into the skin. The tone of the Light shade is definitely quite yellow on me, which surprisingly works well not only on areas of redness but also under my eyes (I have a lot of purple tones there, but if your eye area is more olive, this may look too ashy).
I would say the coverage of this concealer is medium, so for me personally it's not really suited for pin-point blemish concealing. It's sufficiently opaque though to disguise the darkness under my eyes or redness around the nose. When blended in, the finish of this concealer is a natural satin, but unfortunately on me, it sometimes exacerbates texture under my eyes, and I find it a bit difficult to layer over my eye cream - it blends out unevenly, especially towards the outer corners. It looks alright when I pat it in with a finger versus blending out with a brush, but I'm not sure if the results warrant babying this product so much; judge for yourselves in my uncomfortable eye close-up.
L-R: Laneige Cushion Concealer in Light, Bobbi Brown Corrector in Porcelain Bisque, NARS Radiant Creamy Concealer in Chantilly
No concealer on the left under eye area, Laneige Cushion Concealer applied on the right.
Overall, I think it's an average concealer - it's just a bit too much effort for me to coax it into behaving the way I would like it to. Looking at the photos of my under eyes with and without concealer, I actually think the two sides don't look all that different, and maybe I'm just not the best judge when it comes to under eye concealers because I don't have huge issues to conceal in that area. If you've been thinking about purchasing Laneige's Cushion Concealer, keep in mind the two major downsides of this product: very limited shade range and the price per ounce - 2.5 ml of product isn't a whole lot (in comparison, NARS Creamy Concealer contains around 6.5 ml, while the Maybelline Age Rewind contains 6ml for $7-8). Have you tried any of the spin-off cushion products? What is your current favorite concealer?

Disclaimer: Item marked with an asterix (*) is a press sample I received from the brand's PR for review consideration. All links are non-affiliate. All opinions are 100% honest and unbiased, no matter if the products featured were purchased with my own monies or provided as free press samples. Thank you for reading!

Monday, November 23, 2015

Minimalist Monday: 3 Years Into My Low Buy and Plans for 2016

I've wanted to discuss something that's recently been on my mind a lot, namely my experiences with doing a make-up low-buy for three years now and my plans for 2016. Before we dive in, there's one thing I'd like to clarify: I'm not trying to advocate any minimalist agenda or forcefully attempt to convince you to change your habits in any way. If you're happy with your stash and your purchases, GREAT - I envy you, and you do you. The reason I'm stating the obvious (to me at least) is that I've recently come across this sentiment that some minimalism-leaning bloggers can come across as a bit militant in their opinions. I have no such intention - this is just a personal blog and I'm coming here to share MY feelings and struggles, and if it inspires someone to change something they've been uncomfortable with anyway, then that makes me really happy; but if not, that's okay too.
Alright, enough of boring disclaimers, let's get to it. Above is the main reason for this post - the contents of my back-up skincare drawer. That's right, it's all back-ups, meaning it's not even all of my skincare; the stuff I'm currently using is in my bathroom cabinet, which I'll show you an update on some other time. In my defense, very few products inside this bin are what I've purchased myself; probably 90% is gifts, gifts with purchase and press samples. But you see the problem, yes? YES?! It's freaking 15 pounds worth of skincare I'm not using, it's just sitting around, waiting for its prime. I don't need or want all that... so what to do?

In my first couple years of beauty obsessing and documenting it on the blog, I had set a loose monthly budget for myself in the amount of $50. It was supposed to include all 'fun' expenditures such as clothing and accessories as well as make-up, skincare, nail polish, you name it. It seemed reasonable at the time, and the amount was something I was comfortable with spending for non-essentials. Looking back on it now, I can honestly say that a beauty budget did NOT work for me. I wasn't very dilligent in tracking my expenses, meaning that I very often went over the $50, but the main problem is that it resulted in a proliferation of cheap thrills in my wardrobe and beauty stash. I'm not saying cheap to be offensive - I'm all for affordable things if they're good quality. Unfortunately, most of what I bought wasn't, and on top of that, I was soon overwhelmed with the amount of clothes and products in my possession.
Enter phase two, which was my beauty low-buy, introduced at the beginning of 2013 as a 'No Back-Ups Challenge' (read the original post here). I decided to give myself an allowance of two make-up products per month, without setting any budget goals, and work hard on using up all my extra products across several categories, mostly skincare. I'm not going to lie - it was VERY difficult at first. For someone used to popping into a drugstore 'just to see what's new', and usually leaving with a couple make-up toys in tow, having to thoroughly think through all my purchases, plan ahead and only get two out of the large pool of everything I fancied was hard. So I did stumble here and there, and definitely at the end of 2013 I had accumulated more than just 24 new make-up products, but I did make a large dent in my back-up stash, and it was a start (here are my thoughts at the end of the year). So I just stuck to the same low buy again in 2014, and added in another stash-reducing challenge via Project Make A Dent and various declutters. This time it went even better than the previous year; I was able to stick to my resolution more, and developped some strategies to help fight lemmings and urges to shop while learning to appreciate what I already had (final post for 2014 can be found here).

Now this year, I do think that my low-buy has really taken hold and taught me a valuable lesson. In 2015, I've been able not only to limit my purchases, but actually change my behavior and thought patterns when it comes to beauty shopping. I think I'll discuss my experience and strategies in more detail in a separate post next month, but I wanted to share my back story with you mostly to show you that in my case, it has truly been a slow evolution towards the ultimate goal of an edited capsule collection that makes me happy and grateful instead of causing anxiety and stress. It's definitely a loosely defined goal, and as such, the particulars of it keeping changing, namely towards even smaller and simpler stash.
But let's get back on track - if I've been such a pro at reducing and editing my stash, why that skincare back-up explosion, I hear you ask? Well, first off, it was actually worse than that in the past *gulp*. On top of that drawer, I had another drawer, and then a lot of products under the bathroom sink. In fact, I even had a hanging organizer on the bathroom door at one point because I had so much extra stuff. The organizer is now gone, and my bathroom cabinet currently houses just haircare and travel items, so this drawer plus what I've dubbed my 'soap box', pictured above, is all that I have left - and it would be much less than that if not for generous friends and PRs. But still, for me, the contents of those two containers are way more than I would like to keep on hand at any given time. Which is why for 2016, I decided to do go full throttle and introduce a complete SKINCARE (for the face AND body) NO BUY. It's like the ultimate challenge for a beauty junkie, am I right?

I think that this time, the challenge won't be so much in fighting lemmings because I feel that I've gotten pretty good at keeping myself in check. However, I may struggle a bit with not purchasing products that are more convenient to use than what I already have on hand for that purpose. For example, I'm not really loving bar soaps as much anymore - I got used to fancy shower gels now, and it's nicer to indulge in a scented body lotion than slather your limbs in a natural plant oil. I realize that in this scenario, many of you would just get rid of the surplus bar soaps & oils and happily purchase your favorites in their stead, but to me it feels wasteful and unnecessary. My other reason for attempting to use and use up these particular products is that they're more eco-friendly and sustainable, as well as less irritating for my sensitive skin. The second issue I'm foreseeing here is that like a true hoarder, I'm slightly worried about not having enough face cleansers or toners to last me an entire year. But you know what, I'm determined to make it work - I could just as well DIY a cleansing oil like Gummy, or try the Oil Cleansing Method again. I'll make do; as long as my skin is happy. If for any reason any of my back-up products turn out to harm my skin, I will pass them along and ultimately purchase a replacement if no more back-ups remain in my queue. Simple as that.

I will definitely document my progress with photos in a year's time, or sooner, if that turns out to be the case (ha! I wish). I would also like to point out that my no buy does not mean I won't be accepting press samples or gifts. While the influx of products for review consideration may seem to hinder my progress, this is a beauty blog after all, and I enjoy trying and reviewing products for you. I also very frequently pass things along to family and friends, and it makes me happy that I can give back and share great products in this way. But enough about me - do you guys have any stash-reducing plans for 2016? Have you ever attempted a beauty no buy? If so, what was your experience like?