Saturday, May 31, 2014

In My Toolkit: New Brushes, Sponges, Puffs...

... Oh my! I happen to be a bit monothematic this month, so here's some more beauty tools I've recently added into the mix (thanks, IMATS!). It's a bit of a weird mix of brush hits & misses, foundation sponges, powder puffs, a hair brush and even some cotton squares; but I'm pretty excited about some of these discoveries and I'm hoping you'll find something interesting here to try out.
First of all, since I'd never tried the original pink beautyblender, 
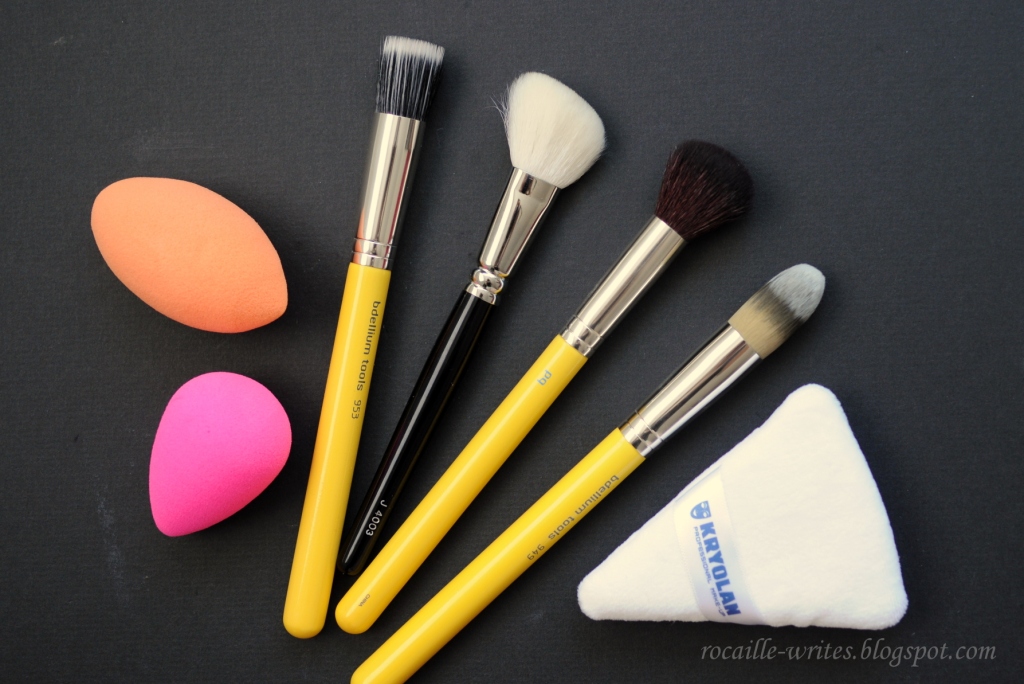
Kar Yi agreed to split a discounted pack of two that we got at IMATS with me, which worked out at $11 each - I could never quite stomach the original price tag of $19.95. I mostly wanted to compare the beautyblender to the Real Techniques Miracle Foundation Sponge I reviewed here - and you know what? My gut feeling was pretty spot on, both of these sponges work exactly the same, except the Real Techniques retails for $5.99. The Beauty Blender is slightly smaller and obviously the shape is different, but I actually find that the Real Techniques sits a bit more comfortable in my hand when applying foundation... and the beautyblender leaks some of that neon pink dye when washed.
While browsing at IMATS, I also picked up a new jar of powder from Kryolan, fearing my other powders wouldn't stand a chance against the hot and humid New York summer (more on the powder in a separate post). They had this cute Triangular Powder Puff laying around, and at $2.90 or something ridiculous like that, I really wanted to try it out - especially that pressing powder into the skin with a puff controls the oil a bit better than just dusting on with a brush. I find that getting the right amount of product onto the puff is a bit of a learning curve, but the triangle shape works really well for getting into the little nooks and cranies around my nose and eyes, and the finish is not any more cakey than when working with a brush.
Following on the face make-up theme, here are my two new blush brush loves. I hadn't been satisfied with my blush brushes for a while and silently promised myself not to settle on a mediocre one and actually shell out out the money for something outstanding. And this is it: the goat hair Hakuhodo J 4003 Highlighter Brush Angled, $40. You may notice that the brand calls it a highlighter brush, but on my small face, it works very well for precise blush placement - and it feels like my cheeks are being stroked by a soft, furry kitten paw. The knowledgeable staff member at the Hakuhodo booth explained to me that the brush is meant to be used in a sweeping motion at an angle, and not for vertical swirling and buffing motions, which is how I've been yielding it, and I'm very happy with the results; it works for both softer/ more pigmented as well as stiffer blushes.

At the bdellium booth, I decided to spring for a stippling cream blush brush: the Studio 953 Duet Fiber Foundation, $14. I'd never had a smaller stippling brush for cream products and previously always used my fingers for blending, but this brush makes it so much easier to get an even layer of product - and I love that I can seamlessly add more at the end of my make-up routine without disturbing the foundation and concealer underneath.
Speaking of bdellium tools, here are two brushes that did not work out for me: I picked up the Studio 945 Contour, $11 to use with contouring powders and bronzers for a more sculpted application, but I found the bristles to be a bit too stiff and scratchy - and it's also the first of my bdellium brushes that actually sheds quite a bit. The round Studio 949 Pointed Foundation, $14 was a bit of a let down as well: it leaves some brush marks on my face, but more importantly, soaks up a lot of the product and needs to be cleaned after every use. I can't fault the quality of this brush, it's just that perhaps, the bristles are bit too densely packed and too resistant to successfully blend my liquid foundations.
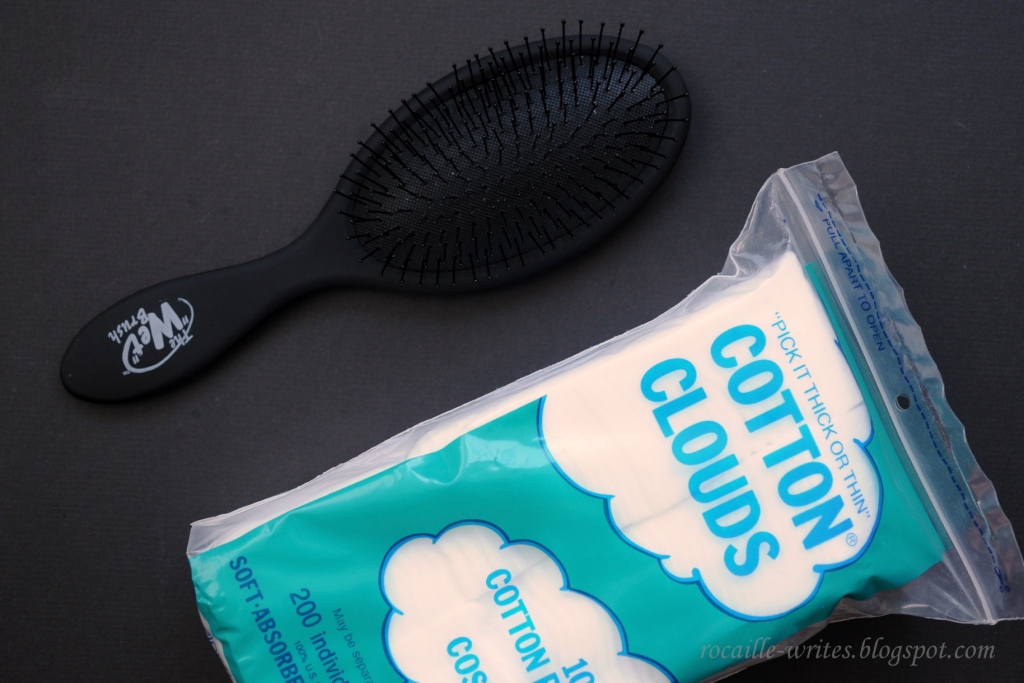
Now for the slightly more unusual tools that I now can't be without: my fine hair has always been extremely tangly, and as a little girl I would run and cry when my mum attempted to brush it. How I wish I had the Wet Brush Detangling Shower Brush, $14, back then! It looks just like any old plastic hair brush, but the longer, fine, soft bristles work amazingly well to detangle my longer locks, without pulling or breaking hundreds of strands in the process. It works well on wet and dry hair, and I in fact, I now enjoy brushing my hair and massaging my itchy scalp with this brush.
The other odd product to talk about are these Cotton Clouds cotton squares (I got a set of three packs, 200 cotton squares each, for $11.99 + $3.15 shipping on Amazon). I first heard about these from Kristen Gehm on YouTube; she said they were dupes of the more expensive Shiseido cottons I've always wanted to try. In the photo, you can see one square compared to my regular Studio 35 cheap cotton: the Cotton Clouds are much thicker and comprised of many layers - you can peel them apart how thick or thin you want. They're both softer and much more durable than the cotton squares I'd tried in the past, and most importantly, don't leave little infuriating cotton fibers all over my face. I'm really happy to have found those!

I think I'm now all set with my new tools for a while; it's always fun to upgrade the basics you're reaching for every day and thus enjoy the grooming process a bit more again. Life's little pleasures! Have you found any interesting new beauty tools recently?

Wednesday, May 28, 2014

The 5 Ingredient Skincare Routine

We're talking the bare bones of skincare today, my dears. You know how sometimes we get so wrapped up in the newest and most innovative skincare products on the market that we completely forget about the simplest solution? This minimalist 5 element routine is just a rough guide to remind us all of the natural goodness of basic ingredients - because sometimes we don't have to shell out the big bucks for a product to work effectively, and we don't need the extra bells and whistles to get things done.
A little disclaimer before we proceed: obviously not every ingredient works the same for every skin type, without even getting into allergies. More importantly, this skincare routine will not be the most effective in treating specific skin concerns/ conditions, like pigmentation, fine lines & wrinkles, acne, eczema - but it may still help if you include some targeted treatments containing active ingredients. Please view it as something akin to a scaffolding you can then build upon. As an example, for my skin concerns (acne-prone + hyperpigmentation marks) I'd supplement this routine with a pigmentation-fighting serum, an AHA/BHA exfoliant, and sunscreen for daytime. Hope that clears the confusion - I am not abandoning my regular skincare, just showing another option!
1. Cleansing & Make-up Removal: Pure Virgin Coconut Oil (I'm using Dr. Bronner's Magic Fresh Pressed Unrefined Coconut Oil, $11.33 for 14 fl oz)
You know the cleansing balms I've been raving about for some time now? Truth is, coconut oil is just as effective in removing my make-up and cleansing the skin, at a fraction of the price. The texture is very similar to most natural oil-based cleansing balms: it's a soft balm at room temperature, which then melts into a deliciously sweet-scented oil when massaged onto the skin. Coconut oil is slightly heavy and some sources classify it as comedogenic (pore clogging), so make sure to really remove the last traces of oil residue from your skin with a warm washcloth. This is also the reason why I'm not recommending it as a facial oil, but it's amazing for moisturizing your body and hair. For convenience reasons, I scoop out some of the oil from my big jar and store in a smaller, more shallow repurposed jar in my bathroom. I keep the big jar in the kitchen to make awesome homemade granola with!
Other options: You could absolutely use other natural oils for this step, or even a blend of oils with castor oil, as recommended in the Oil Cleansing Method (OCM). I just find coconut oil easier to handle, and I love the smell :)
2. Toning: Hydrosols/ Flower Waters (I'm using Mountain Rose Herbs Rose Hydrosol, $7.25 for 3 oz)
I've spoken about the benefits of rose hydrosol before (here), but this by-product of essential oil production works great to refresh and hydrate the skin, with the added bonus of beautiful floral fragrance. Other hydrosols are fantastic as well, and you can tailor them to your own needs: calendula soothes irritated skin, cucumber cools down rashes, lemon verbena acts as an astringent - so many different ones to try!
Other options: If your skin is very sensitive/ you're allergic to essential oils, you could just use a thermal spring water spray, like the ones offered by French pharmacy brands (Avene, Vichy, La Roche Posay). Or you could attempt a DIY herbal infusion with green tea or comfrey - just make sure to store it in the fridge and replace every couple weeks.
3. Moisturizing: Skin type-specific natural carrier oil (I'm using Mountain Rose Herbs 100% Pure Organic Hazelnut Oil, $5.25 for 8 oz)
In the moisturizer step, I like to use a light, easily absorbed oil: I'm currently experimenting with hazelnut oil, which is supposed to have astringent & skin-refining properties, but in the past I've also liked jojoba, tamanu and argan oils. For better absorption, I recommend pressing the oil into damp skin, meaning shortly after you spray it with your toner of choice - this also helps the oil to seal in the moisture from the spray.
Other options: As I mentioned above, any natural oil that you like will work for this step. If you're curious about which carrier oils work best for specific skin types, there's lots of information available online - but I found this guide from Christine very helpful to start with.

4 & 5. Masks/Spot Treatments/Cleanser Alternatives: Powder Clay & Raw Honey (I'm using Wedderspoon Organic 100% Raw Manuka Honey Active 16+ , $40.86 for 17.6 oz,  and Aztec Secret Indian Healing 100% Bentonite Clay, previously reviewed here, $4.99 for 1lb).
Clay and honey are two extras that work wonders incorporated into any skincare routine, be it natural or not. Manuka honey (or any raw honey) can be used straight as a cleanser, facial mask, spot treatment or intensive lip balm, because it soothes and moisturizes the skin (honey is a natural humectant) while also providing some antibacterial action. As a cleanser, I find that it works best in the morning, or as a second cleanse in the evening to follow up the coconut oil.
Powder clay obviously has to be mixed with something before usage: water is the easiest, but you could also use the hydrosol from the toning step, or the carrier oil from the moisturizer step, or honey, or the combination of all of them - for whatever you're trying to achieve. When blended with a little bit of water, clay can either work as an oil-reducing facial cleanser, or a pore-tightening mask (also great for just dabbing on active breakouts); adding oils or honey will make it less drying while still providing some detoxifying action. The mixing possibilities are endless!
Other options: Manuka honey is unfortunately very expensive, but any natural raw honey will work - I like the Y.S. Eco Bee Farms US Grade A Raw Honey ($6.29 for 22 oz) that I also use for cooking. There's also a variety of different clay powders available on the market, with different properties for different skintypes: NOW Foods Solutions offers jars of Moroccan Red Clay Powder and European (Green) Clay Powder ($4.49 for 6 oz each).

I hope you found this very basic guide to natural skincare ingredients helpful - I've tried to list things which are quite easily accessible and should work for a variety of skin types. In terms of reliable websites to shop for natural products, Vitacost (click for referral link and $10 off) is my favorite: the prices are much lower than local health stores like Whole Foods, and the selection is much wider as well. For more difficult to find natural ingredients, Mountain Rose Herbs is pretty unbeatable, but the shipping tends to be on the expensive side.

Do you use any natural ingredients in your skincare routine? What are your favorites?

Sunday, May 25, 2014

An OPI-Heavy Month in Nail Polish: Spring 2014

...also known by the (more frank) name of nail polish spam. And yes, I'm vaguely aware that spring is a season, not a month (although it's harder to believe here in New York); but these were spread out so far apart that I suspect they actually cover the span of three months rather than just one. But I'll roll with it regardless.
We'll go in the anti-chronological order for this one - because I'm excited to show you that I recently attempted to shape my nails. I've always known that a straight-up square shape is not for me, as my nails grow more oval naturally and that's the shape of my nail beds, but I was weirdly squovalling them (is that a word?) most of the time. But no more! I've grown them a bit longer and filed down the sides for a more oval/almond shape, and I've taken to affectionately calling them my 'claws'. I'm in equal parts terrified of and fascinated by the Morticia Addams look they give me. What do you think - yay or nay? Oh yes, and this is two coats of OPI You're Such a Budapest from last year's Euro Centrale collection.
See, here's what I meant by the undecided squovals. Meh - both shape and the actual manicure. Shown here are two coats of OPI I Theodora You from the Wizard of Oz collection, topped with one extremely thick coat of OPI Lights of Emerald City glitter. The extreme thickness of the sparse glitter resulted in bubbling, dragging and very slow drying time - I completely destroyed two of my right hand nails within an hour of polishing. Fail.
For this one, excuse my poor execution and shrinking top coat, but OPI Red Lights Ahead... Where? (from my set of Holland Collection minis) is actually a beautiful shade of orange/coral red with cream finish. I used to be very much against warm reds, but I think I'm slowly... warming up to them? (ok, I'll stop now). I've been playing with an idea of getting an orange red lipstick - any suggestions, preferably drugstore, just in case I don't like it?

My first nail stamping attempt! The base is three coats of China Glaze Lemon Fizz (previously swatched here), stamped with OPI Alpine Snow and the floral pattern from the Born Pretty Store QA82 Plate*. The awesome folks at Born Pretty kindly provided me with some beginner nail stamping supplies - I received the plate, my first stamper & scraper set*, as well as a 10% off coupon for you guys (WTG10) - but I think I'll talk about my stamping experience in a separate post.

As you can see, my manicure is far from perfect (I've had the most issues getting an entire image to transfer onto my curved nails), but it was so much fun experimenting! And I think it was a smart choice to go for low contrasting colors, which makes the flaws slightly less apparent; and the color combination reminds me of a cute floral summer dress, perfect for offsetting the grey New York weather we've been having this week. What have you been sporting on your nails lately?

http://www.bornprettystore.com/sample-review-c-268_614.html

Disclaimer: The products marked with an asterix (*) were press samples I received from Born Pretty for review consideration. All links are non-affiliate. All opinions are 100% honest and unbiased, no matter if the products featured were purchased with my own monies or provided as free press samples. Thank you for reading!

Thursday, May 22, 2014

Chanel Summer 2014: Illusion d'Ombre in New Moon no.97

Here's my other cheeky purchase from Chanel Summer 2014 collection: the limited edition Illusion d'Ombre Long Wear Luminous Eyeshadow in New Moon no. 97 ($36 for 0.14 oz/ 4g). While I ogled Chanel cream shadows in the past and admired the shades, I wasn't eager to purchase after hearing they tend to crease on oily eyelids, which I regrettably have. But... I couldn't say no to New Moon. Just look at it!
Chanel Illusion d'Ombre shadows come packaged in a hefty glass pot with a screw-on lid, and a nifty little brush for applying on the go; although the shape of the brush suggests it may be better for lining the eyes rather than packing on color. While the design of the packaging doesn't make me very assured as to the shelf life of the product, it sure does look pretty on my vanity.
If you've never had the chance to play with the Illusion d'Ombres, they have an interesting, slightly moussey/bouncy texture when pressed. The cream itself isn't actually overly creamy; it feels a bit dry to the touch and reminds me more of the L'Oreal Infallible eyeshadow formula than a typical cream eyeshadow like the Benefit Creaseless Creams. This results in some difficulty when trying to pick up product with a brush; I find that fingers work best for packing on the shade. In terms of longevity on the eyes, other reviewers were right: it creases in a couple hours when used on bare lids, but stays put without any issues over eye primer (NARS Pro Smudge Proof Eyeshadow Base).
What I couldn't resist, however, was the shade New Moon itself (How excited are those non-French speaking beauty fanatics for a shade name they can actually pronounce? Emerville... Emervelle... Emerveille... Oh for God's sake!). New Moon is a warm, rosey brown with a touch of burgundy somewhat akin to shades like Urban Decay Toasted or Too Faced Push Up, and some amazing, complex microglitter - I spy with my little eye some fuschia pink, lime green and gold. The actual warm brown base becomes more diffused when blended out on the eye, and the glitters really shine through, giving an almost wet/glistening appearance.
My favorite part of this shadow, which I would usually call a glittery mess and call it quits, is the fact that the multicolor glitters really stay put and don't migrate all over my face (I'm looking at you, Urban Decay Sidecar and Too Faced Nude Beach!). This allows me not only to avoid looking like a five year old at a birthday party, but also to place the Illusion d'Ombre exactly where I need it, and/or use it as an accent for textural variety.
Here's another simple (or, you know, boring) look showcasing New Moon all over the eyelid, blended slightly out, and smudged along the lower lashline. As you can see, this shade doesn't have very opaque coverage, so that some of my pinky purple eyelid veining peeks through (but it's in the same color family as the shadow! Whatevs.). I used Urban Decay 24/7 pencil liner in Whiskey for some definition at the lash line, and finished with two coats of black mascara. I was slightly bored of the usual summer bright peaches and pinks, so I opted for a wine red shade on the lips (Wet n Wild 522A with Osmia Luster for extra shine). Base is Bourjois Healthy Mix Serum mixed with YSL Le Teint Touche Eclat, Stila Convertible Color in Lillium on the cheeks.
In one sentence, I love my Illusion d'Ombre in New Moon and have nothing remotely like it in my collection (hence no comparison swatches - well that, and I got too excited and forgot). Definitely check it out if you've had enough of 'boring neutrals' but need something easy to wear on the eyes. Do you own any Chanel Illusion d'Ombre eyeshadows? What are your favorite shades?

Tuesday, May 20, 2014

Eye Blending Brushes Overview

What I limit myself in spending on make-up products, I channel into upgrading and diversifying my make-up tools - can't quite stay true to that low-buy! Today I wanted to show you an overview & comparison of my eye blending brushes, since I've recently got a couple more buzzed-about specimens and thought this might actually be quite helpful. A little disclaimer before you dive in: I'm not going to pick which of these brushes is the absolute best and tell you to run out and get it. I really do believe brush preferences are very individual as well as dependent on your eye size and shape; but hopefully you'd be able to extrapolate from my comments to suit your own eye blending needs. Another extra disclaimer: I do not own the MAC 217. So there.
Now, while in my eyes (har har), there are no exact dupes in this round-up/ all of these brushes perform slightly different, I obviously do not use them all at the same time. I usually have just one blending brush out that I use to deposit eyeshadow in the crease as well as lightly blend it out, another clean larger brush to further blend out the edges and a smaller, more tapered/pencil brush to deepen the outer V. Nearly all of the brushes shown here are used to place shadows in the crease and buff them out - I don't often faff around with the extra two mentioned above.
There are two basic brush head shapes you can see here: 4 pinched/ oval brushes and 2 round/bullet brushes. I have placed these brushes on a left-right continuum from oval and sporting the longest bristles/most tapered, through oval with shorter bristles, to round with the longest bristles again. Does that make sense to anyone? Hmm, maybe not. Anyway...

1. Wayne Goss Core Collection no. 06 Brush ($25, available on Beautylish, blue squirrel hair). The #06 brush has a pinched ferrule and longer bristles, resulting in something between a squashed oval and a paddle-shaped brush. According to the Beautylish representative I spoke to at IMATS, this is supposed to be Wayne's answer to the MAC 217, but I suspect it's actually quite a bit different. Wayne's brushes are handmade in Japan (reportedly in the Hakuhodo facilities) from uncut bristles, and the high quality is evident - the hairs feels luxuriously soft and the brush doesn't shed, but I find that it doesn't hold its shape the best after washing, even when dried in a Brush Guard. Despite that, I do like this brush quite a lot but find it a bit less intuitive/awkward to use because of its bordeline paddle shape and slight floppiness; I have to maneuver and turn it this way and that when blending shadows out, and it picks up less product than its denser brothers. Beautiful brush, but perhaps not the best for the 'whack and go' approach I opt for most days.
2. Sigma Beauty GWP Travel Blending E25 Brush ($12 for regular size, goat hair?). I own three Sigma brushes that I acquired somewhat accidentally, and I'm not a fan of either. While the E25 has an almost ideal shape and size to suit my needs (neither too large or too small, oval shape, some resistance to the bristles that allows for more controlled/precise shaping), the execution is rather poor: the bristles are slightly scratchy, the brush head has some unevenly cut hairs poking out, the hairs themselves are almost textured/frizzy and not smooth. It's not my favorite, but I still use it - and the shorter handle on their GWP version is quite handy for travel. I do not however understand the amount of hype surrounding Sigma products, and I will not buy (or uhm, further acquire?) any more of their brushes.
3. bdellium Tools Studio 776 Blending ($9, goat hair?). If you want my recommendation for an inexpensive, versatile blending/crease brush, this is it. I've had this particular 776 brush for about three years now (still going strong!), and it remains my most used eyeshadow brush. The 776 has marginally shorter bristles/more compact and rounder head than the Sigma E25, so it's perfectly suited to perform a myriad of functions on my small-ish lids: placing, shaping and blending both powder and cream eyeshadows on the lid as well as in the crease with just the right amount of control. I think it's a fantastic brush for the price, and while the firmer bristles are not always able to create the perfect diffused/blended out transition in the crease, it's simply the quickest and easiest to use for everyday shadow application.
4. Real Techniques by Samantha Chapman Shading Brush ($6, synthetic bristles). I hesitated to include this brush in this overview simply because I don't actually use it as an eyeshadow brush - I find it better suited for cream concealer. This is a wide, dense, slightly larger brush, and so not the ideal size for my limited crease space. It does however work fantastically well for really buffing products into the skin: the bristles are soft but quite firm, so you can blend products in very thin layers. I actually think it might work for me as a cream shadow brush; but it is too big for me to place or blend eyeshadows in the crease.
5. bdellium Tools Studio 781 Crease ($10.50, natural bristles, maybe horse?). On the other hand, the bdellium 781 is too small for me to use as an eyeshadow blending brush. It's a round, compact, firm brush with a slightly tapered head, a bit larger than a pencil brush but a similar shape. I find it perfectly suited for deepening the outer corners or precise placing of darker shades on the eyes - quite similar to what I was using the limited edition MAC 226 brush for, so if you're looking for a functional dupe, it's worth looking into.
6. Hakuhodo J 5533 Eye Shadow Brush Tapered ($17, uncut goat hair). Dear readers, meet my new brush love - the soft, round, slightly floppy J 5533, aka the 'Fluffy'. As you can hopefully see from the group shots, this brush has the longest bristles, and so displays slightly less control than either Sigma E25 or bdellium 776; but it has the upper hand in perfectly diffusing eyeshadows in the crease into nothigness. Because of its softness/floppiness, it doesn't pick up a lot of product, but it's enough for my usual subtle crease needs. The brush head is the perfect size for my eyes, and it's just so, so pleasant to use. A new staple - and I'll definitely work on building my Haku collection in the future. There are so many to choose from!
I think eyeshadow blending brushes are probably the hardest to get just right, and something that's worth experimenting with. For more blending brush nit-picking, including more Hakuhodo, Tom Ford, Paula Dorf, MAC, Suqqu and others (I know) check out Driveller Kate's post here. Do you own multiple eye blending brushes or do you find just one sufficient for your needs? Do you have any favorites?

Saturday, May 17, 2014

Chanel Summer 2014: Rouge Allure in Conquise no. 144

It's hard to wear summer make-up trends when you're a pale, pale gal with cool undertones. Warm copper shades on the eyes = a crazed rabbit with a violent case of rabies and pink eye. Tanned bronze goddess = Oompa Loompa overdosing on self-tanner. And lastly, orange lips = I stole this lipstick from an unsuspecting friend/relative because it looked so awesome on them. Uhm... just not really on me.
So yeah, oranges are few and far between in my lipstick drawer. But when I swatched the new limited edition Chanel Rouge Allure Luminous Intense Lip Colour in Conquise no. 144 ($34 for 0.12 oz/ 3.5g), I was well, conquered *snickers childishly*. It packed enough punch to brighten the face, and the tone looked just right - not too aggresively orange, slightly muted for daytime. Having never tried the Rouge Allures, I succumbed to the secret agent feel of the tube with its clicky release mechanism and the impressive pigmentation and luxurious slip of the formula.

My previous experiences with Chanel make-up haven't been so absolutely memorable to justify the price tag, so I found myself rather surprised to be picking up Conquise and one more item from their Summer 2014 collection, which I'll be reviewing very soon. In the end, I sold my first Chanel lipstick (Rouge Coco in Sari Dore) in a blog sale, very rarely reach for my only tube of Rouge Coco Shine in Monte Carlo, and can never get a decent shade match in their foundations. But I don't know, I was in the moment, I felt inspired by the shades compared to what other brands had on offer, and I just went with it. Oh, and I also had the rare coupon that could be applied to beauty purchases.
Chanel Conquise is a muted coral shade with a fair dose of rosy pink and some subtle shimmer that translates into a luminous satin finish on the lips. I'm sorry that my shots are not super color-accurate; I think orange shades are pretty notorious for not coming through properly on camera. As you can hopefully see in the swatches, it's slightly warmer/ less pink than my almost finished tube of Rimmel Moisture Renew Lipstick in Soft Coral, which I'll be replacing with Conquise. It's similar in tone but much more pigmented and slightly softer than Giorgio Armani Rouge d'Armani Sheers in Coral 301, and a lot more orange than MAC Lustre Lipstick in Jest.

In terms of formula... it hasn't topped my current favorite high-end lipstick, which is Guerlain Rouge Automatique (here's my review of the shade Shalimar). Rouge Allure in Conquise has very good pigmentation and feels soft and velvety going on, but tends to dry out and settle in a couple hours, requiring a touch-up - and it doesn't quite survive a meal in full strength, but does leave a pretty peachy stain behind. It's also not quite as masterful as a Rouge Automatique in perfecting any unwanted texture like lines or dry patches on my lips. So... yet again, I'm not completely blown away by Chanel's lipstick formula. But Conquise is a lovely shade, and it wears well enough to warrant keeping.

Here's an easy summer look to compliment Conquise: warm pink and peach shades on the eyes with a subtle dark brown eyeliner flick (Urban Decay 24/7 in Whiskey), peachy pink cream blush on the cheeks (NYC Blushable Creme Stick in Plaza Pink) and two swipes of Conquise on the lips, slightly blended out with a finger towards the edges of my mouth for a more effortless feel. It's all very monochrone, but pretty in the peaches & cream kind of way, and elegant - or more grown-up than the stuff I usually wear. Also, this is what my skin looks like the morning after using Dr. Wu Intensive Renewal Serum with Mandelic Acid 18% (not bad, huh? My pores do *seem* smaller).

All in all, I'm happy that I took an actual trip to the Chanel counter and swatched their Summer 2014 collection - I liked some pieces way more than I expected from just looking at the promo pictures from the comfort of my own home. As much as I dislike the make-up counter experience and prefer shopping online for most of my cosmetics, it's nice to get out there sometimes and discover new products. Have you picked anything up from the new Chanel release? What is your favorite summer collection so far?

Wednesday, May 14, 2014

Exfoliation for Sensitive Skin: Dr. Wu Intensive Renewal Serum with 18% Mandelic Acid

It's not the first and certainly not the last time I've been enabled to purchase a product because of  Driveller Kate's glowing recommendation; as it was the case with this dinky bottle of Dr. Wu Renewal System Intensive Renewal Serum with Mandelic Acid 18% ($28 for 0.5 fl oz/15 ml, I purchased mine on eBay; there's also a 6% concentration available).  Oh you frivolous Driveller, you! *shakes fist*

A couple months back, Kate shared an incredibly helpful post on hyperpigmentation-fighting skincare finds for folks with sensitive skin. In general terms, me and Kate have completely different skintypes, but we do share two common skin qualities: sensitivity and hyperpigmented areas (Kate has adorable freckles, I have less adorable freckles + post-inflammatory acne marks). I was actually planning to get my act together and share an overview/ comparison post of all the different brightening serums I've been trying, but this is (spoiler alert) too good to just sit on for the next couple months - so here it goes!
I think this is officialy the first time I'm trying a beauty product from an Asian brand; I'm normally too confused to try and make sense of the profusion of strange characters on the packaging, or even more confused after reading the machine-translated blurb in English. But soothed by another blogger's rave review, I didn't hesitate long to purchase; and I'm very glad I did! I can foresee some more forays into Asian brands in the future.
My Dr. Wu Intensive Renewal Serum with 18% Mandelic Acid came in a reassuringly foil-wrapped box printed with an expiration date. The English description for once actually makes a lot of sense, and you can also check the full ingredients list: the mandelic acid, derived from bitter almonds, is your exfoliating agent, but it also contains licorice extract to soothe redness and hyaluronic acid for extra hydration. The serum itself comes in a dark glass bottle with a dropper; this is a clear, very liquidy, water-like product, so the dropper is super handy.
I currently use the Mandelic Acid serum twice a week at night, alternating with Murad Rapid Age Spot and Pigment Lightening Serum with 2% Hydroquinone as another hyperpigmentation fighter and Bioderma Hydrabio Moisturising Concentrate every other day for soothing hydration. I put about 5-6 drops directly on my face (forehead, both cheeks, chin area) and lightly distribute with my fingertips, and then press in. This fragrance-free serum sinks in fast, leaving a slightly glowy, moisturized feel; it almost feels like there's something oily that gives a bit of slip to the formulation. I then wait about 20-30 minutes for the acid to do its work (read my book in bed), as per Kate's recommendation, and then follow up with a facial oil for overnight moisture. There is absolutely no tingling, stinging or burning, or even a slightest bit of redness - which is why in the beginning, I thought the serum wasn't doing anything for my skin. But I was wrong!
After using the serum for about two months now, I definitely see a difference to my skin. In the mornings after applying the serum, my skin is smoother, softer and looks more even. It's also nicely plump and hydrated, and there's no irritation in sight - it's perfectly balanced and prepped for make-up application. It seems like the exfoliating action is very, very mild; I've never seen any flakes or areas of dryness after using this serum. But I have seen an improvement in my post-inflammatory hyperpigmented marks: they seem to disappear and even out faster than when I'm just using my Murad Rapid Age Spot Serum, but I've yet to see any discernible results on my freckles.

I find it very interesting that I seem to get much better results on my skin from mild exfoliants geared towards sensitive skin (Dr. Wu Intensive Renewal Serum & First Aid Beauty Facial Radiance Pads) versus stronger/ more concentrated exfoliants I'd tried in the past (prescription tretinoin, higher concentration glycolic acid). I think that maybe the inflammation and dehydrated skin I was getting after using those stronger exfoliants was in fact effectively counteracting any benefits I might have been getting from the active ingredient, and making my skin even more unbalanced, and thus prone to more redness and breakouts. I've recently learnt a hard lesson on overusing glycolics (Mario Badescu Glycolic Acid Toner) - my skin broke out in tiny itchy bumps on tops of my cheekbones and on my upper lip, and it actually looked rather close to eczema. I shoved that toner to the back of my cabinet, busted out Avene Cicalfate, and then slowly reintroduced my milder exfoliants - and thankfully the rash is gone now. But it was a valuable skincare lesson.

Anyway, to conclude this rather lengthy review: do check out Dr. Wu Intense Renewal Serum if your skin is sensitive and you're in need of some gentle but effective exfoliation. The small bottle should actually last you a pretty long time - I've had mine for over two months and I've maybe used up 1/6, so I think the price point is very reasonable. I will definitely repurchase once I run out - I now can't be without it! So thank you, master enabler Kate. What type of exfoliants do you use in your skincare routine? Do you have any favorites from Asian skincare brands?

Sunday, May 11, 2014

Cheap But Not That Cheerful: Wet n Wild MegaImpact Mascara

I've decided to come down from my high-end make-up cloud for a little bit and review the mascara I'm currently using: the Wet n Wild MegaImpact Mascara in Very Black ($3.99 for 0.27 fl oz/ 8 ml). There's something slightly tongue-in-cheek in seeing this neon orange tube between the restrained black packaging of my Bobbi Brown corrector, MUFE powder or BECCA concealer compacts that I rummage through every morning. The ridiculous exclamatives on the packaging just add to the effect: '8 Times Impact! Lifts for Drama! Longest Thickest Lashes Ever! Dramatic Impact!'. I believe this is also the cheapest mascara I've ever used, free mascara samples notwithstanding.

The Wet n Wild MegaImpact has the classic wiry-bristled brush, tapering off at the end - this is where a huge glob of black tar tenaciously positions itself every time you pull out the wand, which then has to be wiped off somewhere. Despite this generous deposit, there's actually very little product on the rest of the brush when it comes to applying the product. For comparison purposes, the brush is roughly the same size as my defunct tube of Covergirl Lash Blast Volume - meaning, pretty big but still maneuverable on the lashes.
Top: Wet n Wild MegaImpact, bottom: Covergirl Lash Blast Volume.

I do think the marketing folks at Wet n Wild must have a pretty twisted sense of humor: the Mega Impact Mascara is actually one of the most natural-looking mascaras I've tried in a long time. One coat gives slight definition and a little bit of volume, two coats give just a bit more in the volume department. The formula is very, very dry - which is great for separating and defining, but not so much for giving extra oomph to the lashes. I find that for the best results, it's better to comb the mascara from root to tip without too much zig-zagging or wriggling at the lashline, as this method can produce some clumping, especially at the tips of the lashes. It's not very lenghtening at all - but my lashes are pretty long to begin with.
Wearing two coats of Wet n Wild MegaImpact Mascara. There are flakes under my left eye if you peer closely. There were flakes on the cheek in my previous post on Yaby eyeshadows too. L'Oreal HiP Eyeshadow Duo in Electrified on the eyes, NYX Tea Rose on the lips.
Where this mascara unfortunately fails me is the flaking department: it does flake. Not as unexcusably as the Kjaer Weis mascara I've tried last year, but there are flakes - sometimes more, sometimes less, sometimes immediately after application, sometimes a couple hours into the wear. To add insult to injury, there's also some transferring onto my browbone in high humidity, which is what we're now starting to get here on the East Coast. There is however one nice thing I can say about this mascara: because of how dry the formula is, the lashes remain pretty soft, flexible and fluttery - but not shiny or nourished like it says on the packaging, let's not kid ourselves, Wet n Wild.
I can't really comment on how long a tube will last you, since for me, it's not exactly usable to begin with; but judging from how dry - how many times can I repeat the word 'dry' in this review? - the mascara is, probably not more than a couple (like one to two) months. As a side note, I'm not a mascara snob by any means; I've actually never purchased a high-end mascara and always choose to go with different drugstore brands, mostly Covergirl or L'Oreal. But, judging from this experience, maybe going for the cheapest mascara at the drugstore is not necessarily the best idea? What are your favorite mascaras at the drugstore I need to check out next?