Showing posts with label Brand Focus. Show all posts

Tuesday, September 6, 2016

New Staple: Kat Von D Lock-it Concealer Crème* & Edge Concealer Brush* Review

It's been so nice this month to have a few brand new products to play with in my everyday make-up routine, especially after reaching for the same old, same old from my 4 months-long Project Pan. While making a concentrated effort to use up older concealers in my stash, I came to the conclusion that I was no longer happy with how they were performing on my skin and I was more than ready to find a new staple for my daily make-up bag. Lo and behold, my wishes have been answered when I was selected to review the new Kat Von D Beauty Lock-it Concealer Crème* in the shades L3 Warm and L5 Neutral ($26 for 0.22 oz, available at Sephora and katvondbeauty.com), together with the brand's Edge Concealer Brush* ($24 each).
You may find this hard to believe but these are my first products I've ever tried from Kat Von D Beauty. I was strongly tempted by a few other items in the past (in fact, I gifted my BFF her Shade & Light Eye Palette for Christmas and she really loves it!) but never actually pulled the trigger. The brand has been generating a lot of buzz for the past few years and it's easy to see why: great shade range and broad availability, staying on top of the trends and building customer loyalty through consistently high quality products (ekhm - maybe with the exception of those now discontinued blush duos). So yeah, I don't really know why I never purchased anything from the brand, especially that it has a major plus for me personally - it caters to a wide range of skintones including very, very fair, and I mean even fairer than me in the middle of the winter.
In the past I wasn't feeling very inspired by KVD's design aesthetic but I have to say that once I unpacked my new goodies, I found myself really drawn to the look of these products. I like the black and silver color scheme, the Gothic lettering, the wax seals for the logo on the boxes and the ink drop on the actual concealer tubes (all of those things combined remind me of the World of Darkness role-playing games I used to play, especially Vampire: The Masquerade).
But the designs are also practical; the concealers have labels on the bottom indicating the shades, and most of the tube's been kept clear to allow you to see the shade inside at a glance. Moreover, these Lock-it Concealer Crèmes have very good stoppers that dispense just the right amount of product onto the applicator and prevent any messes or spilling at the neck of the bottle. I'm also quite fond of the shape of the doe foot itself: it tapers down towards the tip, allowing for a more precise application.
The product claims for the Lock-it Concealer Crème include 24-hour wear, instant full coverage, smooth, even finish, and a crease-proof but hydrating formula (it does contain glycerin and hyaluronic acid). It is meant to be used for all areas of the face (and body): under the eyes, on blemishes and discoloration, and even to contour and bake (huh?!). These sound like rather lofty goals to me, so obviously I was very curious to see if the concealer actually performs to such a high standard.
After 3 weeks of testing this concealer in different conditions, I now feel I have a pretty good grasp of how it works on my skin and for my individual needs. I have worn it under the eyes, on blemishes and hyperpigmented/ red areas of the face, alone and layered with other concealers, on top of two different eye creams, on its own as well as set with powder. The final verdict is that I really like it, although it's not my Holy Grail (still remains to be found). My review is pretty much a comparison to my previous staple, the NARS Radiant Creamy Concealer, which is also a high coverage cream concealer with a doe foot that can be used for under the eyes as well as spot concealing.
Between the NARS RCC and the Lock-It, I do prefer the Kat Von D. It has a slightly thinner texture with maybe a touch less coverage that I personally find much more flattering on the skin. With the NARS concealer, I had to be very mindful of the amount I was using because anything more than a tiny dot would result in a cakey, dry, aged-looking under eye area, and it would also crease and gather in my fine lines quite a bit by the end of the day. I liked the NARS a lot more on hyperpigmented spots and blemishes, but again had to be careful because it had a tendency to look heavy and textured. The Kat Von D Lock-It Concealer Crème looks a lot more natural and seamless on my skin and I do find my under eyes look more rested & hydrated after application than with the NARS. However, it performs slightly worse on blemishes than the NARS RCC; it seems a little too emollient and can slide off the area if not applied properly; I like best to quickly dot it around my problem spots, wait for a few minutes, and then come back and blend it into my foundation. The Concealer Crème also definitely benefits from setting with powder (I've tested it with both MAC Blotting Powder and the Kat Von D Lock-it Setting Powder*, review coming soon), both on the face and under the eyes, where it unfortunately still creases for me - but I have yet to find an under eye concealer that doesn't crease.
L-R: KVD Lock-It Concealer in L5 Neutral, KVD Lock-It Concealer in L3 Warm, NARS Radiant Creamy Concealer in Chantilly, Surratt Beauty Concealer in no.2
As for the shade match, both Light 3 Warm and Light 5 Neutral are currently great matches for my very slightly darker summer skin tone. In theory, depending on your undertones, one shade should work better for the under eyes and the other for elsewhere on the face, but in practice, I have found very little difference in how L3 Warm and L5 Neutral look once blended in. As you can see from my arm swatch, both are definitely darker than my NARS Radiant Creamy Concealer in Chantilly (but both of them are the same depth, regardless of the L-number); if you're looking for something truly fair, KVD also offers the shade Light 1 (Neutral) as well as a pure white shade (White Out).
I have also been very pleasantly surprised by the KVD Edge Concealer Brush*, and it has quickly become my favorite tool to blend out concealer on larger areas of the face (under the eyes, around the nose).
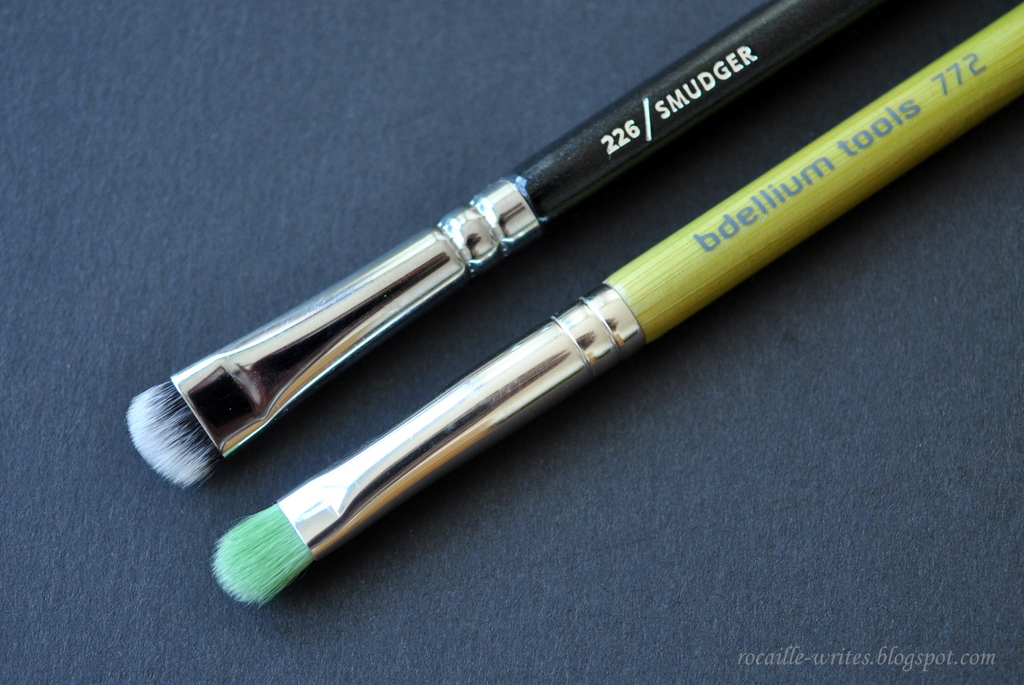
It's a dense duo-fiber synthetic brush with a pinched ferrule but a cut tapered edge; hopefully you can see what I mean in the close-up photo. When I first saw the shape, I thought it was a little gimmicky - I remember when Sigma first came out with their 3DHD brushes, which for the most part weren't reviewed very favorably. However, in the case of the KVD Edge Concealer Brush, I do think this design works very well - the sharper edge allows you to get very close to the contours of your eye/ nose without sacrificing softness or blendability.
I also enjoy the larger size of this concealer brush; compared to my other concealer blending brushes, you can see that the head of the KVD one is much wider, which allows it to cover a larger area quickly. The bristles are not as dense as to drag the product around (as is the case with my Zoeva Concealer Buffer) and the brush can be used both with a stippling and a buffing motion. Overall, I find the quality of this brush to be very good - I've washed it several times since receiving it and there's been no shedding nor any other issues. One thing that takes some getting used to is the length of the handle - most brushes I own are much shorter so I sometimes find myself hitting my mirror with the brush's end. But the elongated, narrowing shape certainly looks very cool... or even slightly lethal :)

I hope you enjoyed this rather lengthy review of these new products from Kat Von D; I realize they're gathering a lot of interest at the moment so I wanted to cover most potential questions. If there's anything else you'd like to know about these, please ask in the comments, and stay tuned for my review of the Lock-it Setting Powder* and Lock-it Setting Powder Brush*. Thank you for reading!

Disclaimer: Products marked with an asterix (*) are press samples I received for free from Influenster for testing purposes. All links are non-affiliate. All opinions are 100% honest and unbiased, no matter if the products featured were purchased with my own monies or provided free of charge. Thank you for reading!

Monday, October 19, 2015

More Zoeva Brush Reviews: 101 Luxe Face Definer, 102 Silk Finish, 142 Concealer Buffer & 226 Smudger

My first Zoeva brush review (click here for more information on the company, the ordering process and 105, 109, 227, 231 and 317 brushes) is currently one of my most popular posts, so I thought it may be helpful to share my thoughts on four more Zoeva brushes I purchased recently. This year, I've been really focused on sorting through my make-up brush collection and updating some brush types that I reach for frequently, and having had great luck with my first Zoeva order, I decided to get just a few more.
Let's start with 101 Luxe Face Definer Brush ($24, also available in vegan bamboo edition). I actually don't have a similar brush to compare it to, but it's a larger face brush with long natural (I'm assuming goat) bristles that taper down, giving it somewhat of an egg shape. The Face Definer can be used for applying setting powder either to specific areas of the face or all around, but I find it especially useful for bronzing and contouring powders.
101 Luxe Face Definer next to 105 Luxe Highlight for size and shape reference
The brush picks up product easily, either using just the tip or a side of the brush, and blends powders seamlessly on the face. The length of the bristles make it a bit more floppy, which works well for avoiding a harsh contour/ bronzer line; it gives a subtler, more diffused effect than the 109 Face Paint brush from my last order, but it also covers a larger area of the face. The natural bristles feel very soft and plush on the skin (obviously not as soft as Japanese blue squirrel brushes, but hey, let's not get ahead of ourselves here...), and wash well with soap and warm water. To preserve the tapered shape and avoid stray hairs, I dry it overnight in a plastic mesh brush guard.
I ordered the 102 Silk Finish ($15.50, vegan taklon bristles) as a back-up for my beloved Real Techniques Buffing brush (pictured), which is a favorite for applying liquid and cream foundations. However, the Zoeva version turned out to be a little different. The Silk Finish brush is incredibly dense with a domed shape, and works well both for pressing/ stippling the product into the skin as well as blending it out in circular motions. Compared to the Real Techniques, it is much denser and thus less flexible on the skin, which is why I like the Zoeva better for stippling rather than buffing motions (the opposite being true for the RT). The 102 Silk Finish doesn't absorb too much foundation, doesn't leave streaks or brush marks, washes and dries well even without the brush guard.
The 142 Concealer Buffer ($10.50, vegan taklon bristles, also available in the Bamboo Edition) is pretty much a scaled-down version of the 102 Silk Finish. Again, it's very dense and has a domed head, which works well to blend out concealer under the eyes and on other areas of the face without losing coverage. Because the bristles are so dense, the brush can also be used to stipple the product on the skin; I really enjoy using it around my nose and on some larger marks/ blemishes elsewhere on the face. Compared to a standard eye blending brush (even the Real Techniques domed shadow/ crease brush), the bristles on the 142 Concealer Buffer are twice as dense and the ferrule is round, not pinched, which translates into a more opaque application.
Lastly, the 226 Smudger ($9.50, synthetic taklon bristles, also availale in the Bamboo Edition) is your typical brush for applying and smudging out darker shades along the upper and lower lashline. The main difference between the Zoeva Smudger and my other eye smudging brushes is the length of the bristles - the ones on the 226 are much shorter, and the ferrule is wider. This makes this brush a lot firmer, which on one hand, feels a bit stabby on the sensitive skin around the eyes, but on the other, makes blending out even the most pigmented pencils or liners incredibly easy. The tip of this brush is also finer than on my other smudgers (see below, compared to Bdellium Tools 772), so you can get a very precise application.

Again, I'm very satisfied with my purchase, and have been using these brushes nearly every day for the past month. I still think that Zoeva has remarkable quality brushes for a great price, even taking into consideration the gradual price increases and the high shipping costs (at least for North America). I feel that I have now achieved a well-edited, high quality brush stash tailored to my specific needs and preferences, so I'm not intending to purchase more brushes from Zoeva in the immediate future, but if I ever need to replacement, I'll happily order from them again. What is your favorite inexpensive brush brand? What are your go-to brushes for applying foundation and concealer?

Thursday, August 6, 2015

More Cult Japanese Skincare: SK-II Facial Treatment Essence, Mask and Essential Power Cream*

Last year when I started getting more into Asian skincare, I became really intrigued by the yeast ferment ingredient trend, started by the cult Japanese brand SK-II. However, I did not have $100 laying around to spend on a bottle, so instead I tried a whole bunch of Missha Time Revolution First Treatment Essence samples, a product that contains similar ingredients for half of the price. You can read my full review here; in short, I was not impressed enough to shell out for a full size.
But this year, when I had the opportunity to try some real deal SK-II products via BzzAgent (it's an online product reviewing platform - you can join for free using my invite here - I don't think I get anything out of this, btw), I was super excited. The kit I was sent contained two mini sizes of the SK-II Facial Treatment Essence* ($105 for 2.5 oz), the star product in the line, and the SK-II Essential Power Cream* ($215 for 2.71 oz), as well as one SK-II Facial Treatment Mask* ($17 each or $135 for a pack of 10).

Let's get one thing out of the way: the whole SK-II line is incredibly expensive, no doubt about it. Normally, I do not have the budget to spend that kind of money on skincare, so I'm always grateful for an opportunity to sample those more expensive products and compare their performance to the less expensive stuff I use regularly. I believe that all SK-II products contain the proprietary ingredient Pitera, which is a yeast/ fungi (galactomyces or saccharomycopsis) ferment filtrate.
The story goes that this miraculous ingredient was discovered at a sake brewery in Japan, whose workers seemed to all have beautiful, smooth, wrinkle-free hands. I've now heard a very similar story from several brands (apparently Caudalie's brightening serum contains sap from grape vines, which the grape pickers would rub all over their skin...), so I don't know how much I trust those 'organic discoveries'. I don't really care about that though - regardless of whether an ingredient comes from a corporate lab or drops of dew gathered from alpine flowers, I just want to know if it works. That's all I care about.

Back to the products, which I've been using for about four weeks now. Starting with the famous Facial Treatment Essence*, I have to say that I'm a little... underwhelmed. It's a clear essence that looks and feels like water, but has a bit of a weird scent to it; smells fine in the bottle, but as I pat it into my skin, I get a whiff of wet dog/ sweaty socks, which sort of ruins the whole luxurious experience. More importantly though, I haven't really noticed any dramatic improvement in my skin from incorporating this product; sure, it feels hydrating and soothing, but less so than the much, much cheaper Hada Labo Hyaluronic Acid Lotion I just reviewed. So there.
On Instargram, several of you told me you really loved the SK-II Facial Treatment Mask*, and I can't blame you. The cotton sheet is nice and thick, and so saturated in essence that I was easily able to reuse the mask (I do that with most of my sheet masks, just seal the package and keep it in the fridge). The shape of the mask seemed to fit my features a bit better than most Korean sheet masks I've tried so far. When I removed the mask after about 20 minutes, my skin was plump, hydrated, soothed and more even. Of course the effects did really last very long, as with most masks, but it still was a lovely treat. I don't know if I liked it as much as the Tatcha Luminous Deep Hydration Mask* ($28 each, reviewed here), which seemed even more soothing, but then it's not as expensive.
The biggest surprise for me was the SK-II Essential Power Cream*, a daily moisturizer with anti-aging benefits. For whatever reason, I just assumed it was one of those after-thought products in the line meant to capitalize on the success of their Essence. However, it's a beautiful stand-alone product: lightweight, hydrating, evening out any redness overnight. In addition to Pitera, it contains moisturizing glycerin and a hefty dose of my favorite niacinamide (Vitamin B3), an anti-aging, hydrating and hyperpigmentation-fighting ingredient.
Thanks to niacinamide, The Essential Power Cream has that very slight nicotine scent, and in all honesty, really reminds me of the CeraVe Facial Moisturizing Lotion PM, both because of the ingredients and performance (the latter is a bit thicker and more of a gel consistency). Given that the CeraVe is one of my all-time favorite night-time moisturizers, that's high praise - except maybe not if you look at the price difference.

To sum up this rather lenghty review, the cult SK-II Facial Treatment Essence, Mask and Essential Power Cream are all lovely products, and I think if you do have a budget to spend on these and have been meaning to give them a try, you wouldn't be disappointed. However, do I think the results I achieved warrant the extremely high price tag? Nope, not at all. I'm glad I was able to try them and get that curiosity out of my system, but I absolutely would not purchase full sizes after I'm done with my minis (thank God). Have you tried anything from SK-II? What was the last expensive product you tried that didn't match your expectations?

Disclaimer: Products marked with an asterix (*) are complimentary samples I received from BzzAgent or the brand's PR for review consideration. All links are non-affiliate. All opinions are 100% honest and unbiased, no matter if the products featured were purchased with my own monies or provided as free press samples. Thank you for reading!

Friday, July 10, 2015

A Cure for Nail Ennui: Glossique Deco Nail Wraps*

I've been so bored with my nails lately that I've been going a couple weeks before redoing my manicure. I don't know if that's a side effect of not buying any nail polishes (but I don't even want any new shades - I like what I have!) or just being very lazy, but here it is: a nail ennui, weltschmerz, lassitude, whatever you want to call it, has officially settled in.
Which is why I was doubly excited to be shaken out of my blahs by an email from a reader and a fellow Polish expat in the US (Hi Magda!), who recently started a nail wrap company called Glossique. I'm sure what I experience must be common to most bloggers and writers at large, but whenever I hear from a reader I get this fluttery feeling, equal parts joy and surprise. Yeah, after six years of beauty blogging, I'm still quite surprised that actual living breathing humans read my blog, and that sometimes they are kind enough to drop me a line to say they enjoy my writing, or to ask for advice. You guys, please write me more often - it's the ultimate blogging reward.
Glossique Cotton Candy* (left) and Purr-fect* (right) Nail Wraps in Regular

ANYWAY. Magda very generously offered to send me a couple of Glossique's wrap designs to try out, and review for you if I cared enough to share. I do care - it's very important for me personally to support the Polish community, and I think most of us like to support small businesses and women entrepreneurs. Glossique's site bursts with over 150 different patterns ranging from simple to whimsical, neutral to bright, abstract or designed around a theme. One sheet of Glossique Nail Wraps contains 19 stickers, which equals 3 manicures or pedicures, and retails for $13 on their website (free shipping on orders $50+). I chose four that I liked (although it was VERY difficult to make a decision, they are all so cute!), and Magda sent them to me in two sizes: petite to fit my fingernails, and regular to fit the toes.
Glossique Fly Away Nail Wrap in Petite*
For my first time application, I decided to go for Cherry Dots* - it just seems like the perfect summer mani, and I like that it comes with an accent in a different color. I'll be honest with you, despite clear instructions, it wasn't easy for me to apply the wraps evenly. It even says on the instruction card: 'As with anything new, there is a learning curve'. Like, no kidding. I more or less got the hang of it by the fourth nail, and my right hand, which I did after the left, turned out much better - which is why it's the one in the close-up shots :)
What I struggled with the most was getting the right size for each nail (I really dislike having gaps on the sides), and then getting the sticker to apply smoothly - I got lots of little air bubbles/ ridges on the sides and at the tip. I'm a bit of a perfectionist, and that annoyed me enough to want to reapply the especially uneven nails. One of my nails is especially ridged because of eczema, and on that one, the sticker just wouldn't lay nicely - I tried three times, and it still looked like, well, a badly applied sticker. I also had some trouble filing away the excess; these wraps are much thicker than another brand I've tried in the past, and my crystal nail file wouldn't cut through these easily. I was also provided with the Glossique Nail Scissors for trimming the wraps (in the photo), which are very sharp and worked great, but I still found it necessary to file for a more seamless edge.
The application difficulties aside, I think Cherry Dots look beautiful on the nails. I wish the accent sticker was a bit wider as to fit my ring finger, but even on the pinky it looks rather cute, if I may say so myself. I found that the wear on the Glossique wraps really depended on how well I applied them to each nail in the first place; if I had a bit of an uneven edge at the cuticle, it would just get bigger as the days went on, resulting in the sticker lifting slightly from the nail. None of these came off completely though when I wore them for 6 days - I actually found them a bit challenging to remove. After taking the stickers off, my nails unfortunately seemed a bit worse for wear with some nails peeling slightly, but it was nothing a good buff and base coat couldn't fix.
I think these wraps are a really fun option to wear once in a while, but I don't believe they can completely replace nail polish for me. I'm sure that if I had more practice with the wraps, they would be quicker to apply than polish, but I will say that I found the first application to be a bit of a challenge, and my nails were a bit damaged by wear, making them more of a 'once in a while' treat.  Do you enjoy wearing nail wraps, or are you a nail polish-only type of gal?

Disclaimer: Products marked with an asterix (*) are  press samples I received from the brand's PR for review consideration. All links are non-affiliate. All opinions are 100% honest and unbiased, no matter if the products featured were purchased with my own monies or provided as free press samples. Thank you for reading, and thank you to Magda for kindly sending these to me to try!

Friday, November 7, 2014

Surratt Artistique Brush Launch and Medium Smokey Eye Brush Review

Fellow beauty bloggers, do you know these posts where you want to publish just the photos and let them speak for themselves? Yeah, it's one of those - but on the other hand, it's make-up brushes, and I have a lot to say. Last week I had the pleasure of attending the launch of Surratt Beauty Artistique Brush Collection, sold exclusively at Barneys New York in the US. Belly from Wondegondigo invited me to tag along (check out her photos and first impressions here) and I couldn't be happier, both to spend time in her company and to stroke some ridiculously luxurious brushes.
Currently, the Artistique Brush Collection includes 12 brushes: 4 face brushes in grey/blue squirrel hair, 3 smokey eye brushes made with the same hair type, 3 flat shader eye brushes in Canadian squirrel, and two concealer brushes in Kolinsky (displayed from the bottom to the top in the photo). All brushes are handmade in Kumano, Japan from the finest, carefully selected materials and take about 60 different steps and a week to create - the Surratt brushes had been in development for five years, right from the brand's conception. In the display case, you can see that the matte, all black handles and ferrules are the exact same length on each brush and feature a beautiful green and purple duochrome ombre design. Troy Surratt also told us about his plans to expand the range to include more brushes: there's a foundation duo fiber buffing brush, a thicker badger hair brow brush, and a retractable spoolie brush in the works.
Troy's assistant, Nathaniel, presenting the Surratt Face Brush, $230.

Surratt make-up brushes are definitely an investment: the jewel of the collection, the Face Brush, retails for $230, and the brand is also working on an even larger soft powder brush that will retail for about $380. The price range is definitely comparable to that of Suqqu, and when Belly asked Troy how he would explain the uncommonly high cost of these brushes to an American consumer, he replied it's all down to the incredibly high quality of his collection: with proper care the brushes should last a lifetime, and he even described his Face Brush as an 'heirloom'.
L-R: Face Brush $230, Sculpting Brush, a mix of blue squirrel and goat hair $90, Highlight Brush $115, Cheek Brush $115
If you ask me about my thoughts on the price of the Surrat brush line, I definitely think you don't absolutely need very expensive brushes to apply make-up beautifully. However, if you perceive your beauty routine as a relaxing, sensual ritual and are completely beauty obsessed like I am, these brushes are certainly a fantastic addition to your collection - I'm already planning more purchases in the future. Another point to note is that if you have access to the Barneys beauty floor, this is the single Japanese-made brush range on the US market that you can physically touch and play with, bar some Hakuhodo appearances at IMATS or other make-up trade shows.
The pom-pom shaped cheek brush in my hand for size reference; it's quite small and dense to allow for a precise blush application and blending
After much oohing and aahing, I've decided to purchase one of the most unique brushes in the Artistique Collection, the Medium Smokey Eye Brush, $65. Each brush comes in a beautiful French-made cardboard box with a sliding top and velvet padding inside - I made a comment that the box is seriously too beautiful to part with and Nathaniel suggested reusing it as a pencil case, which I thought was a fantastic idea.
As you can see, the Medium Smokey Eye Brush has a long tapered brush head, quite a bit larger than my standard crease/ blending brushes, shown below for comparison. I've only ever tried one other tapered blending brush, the LE MAC 226, but the two are nothing alike: the MAC was much smaller, with shorter, denser and firmer bristles, and the only thing it worked reasonably well for was cut crease looks - however, the bristles were so scratchy that I decided to purge it. The three Smokey Eye brush sizes in the Surratt line ensure that everyone can find a good brush to work in their different lid spaces.
L-R: bdellium Tools no. 776, Hakuhodo J 5533, Wayne Goss no. 06, Surratt Medium Smokey Eye
The soft, floppy bristles of the Medium Smokey Eye take some getting used to, especially if you normally use shorter and more resistant blending brushes. However, I'm happy to report that the brush works beautifully to bring subtle definition to the eye. Troy recommended to use the brush by swirling its tapered tip in the eyeshadow and then applying the powder in the crease with a back and forth motion, letting the longest bristles deposit the color, while the shorter bristles on the sides do all the blending for you. He also suggested the brush can be used flat on its side to blend the eyeshadow from the outer corner in. I've been using a combination of both of these techniques and I find they work very well for quickly diffusing pigments in the socket.

There is however a downside to such a large and soft brush head; the Surratt Medium Smokey Eye does not allow for a lot of control, so if you like applying very dark shades in the outer V, I'd suggest using a separate brush for the placement and then maybe finishing the blend with the Medium Smokey. That's true however of most of my standard blending brushes as well.
Overall, I'm quite ecstatic with my new brush acquisiton: I'll try to spare you my exclamations of the 'Oh, but it's so, so soft!' variety, but yes, they're there every time I reach for the Medium Smokey Eye Brush. The attention to detail on these brushes is unmatched, and on top of being very useful tools (or extensions of the artist's hands, as Troy prefers to put it), they're also beautiful objects.
If you have a Surratt counter near you, I urge you to check out the Artistique Brush Collection, if only for the sensory experience (but if you don't have a counter nearby, the brushes are also now available online). I had a lot of fun at the launch and it was a great pleasure to be able to talk freely about make-up brushes, shopping for Japanese cosmetics and the product development process with both Troy himself (a fellow beauty geek by all means) and Nathaniel. Thank you for spending so much of your time explaining everything to us! It's rare these days to find such a down to earth, knowledgeable, passionate face behind the brand.

Have you tried anything from Surratt Beauty? What's currently at the top of your make-up brush wishlist (because I just assume everyone needs to have one)?

Saturday, August 2, 2014

At the Breaking Point: TRIND Keratin Treatment for Nails

The last you've seen my nails, I (and they) were literally at the breaking point; first, I noticed tiny little cracks at the sides of my thumb, index and middle fingers, then there were bigger cracks, annoyingly starting to catch in my hair and on every item of clothing, and then one day, I was opening a tricky cupboard and SNAP! One of my nails completely broke off, and I'm not gonna lie, it did really hurt - and not just my vanity.
I'm not exactly sure what did my nails in this time: in the past, my nails would break a lot from doing housework (soaking in water), but since a big eczema flare-up on my hands a couple years ago, I don't touch any dishes or damp sponges without my trusty rubber gloves. My mom thinks the breakage comes from wearing nail polish all the time, even though I always, always apply nail strenghtener as my base coat. I think that maybe my attempts at an almond shape, coupled with the length of my nails at the time, caused them to be more fragile over time. At any rate, the opportunity to road test the new TRIND Keratin Treatment for Nails* ($45.95 for 2 x 0.3 fl. oz/ 9 ml) could not have come at a better time - so thank you, Trind!
The Keratin Treatment is a duo of Keratin Nail Restorer and Keratin Nail Protector (also available separately) in a handy little kit: 'With the Trind Keratin Nail Treatment kit we provide a chemical free solution for thin, brittle and chipped nails. It is a mild solution that treats the most sensitive nails that have been damaged by wearing artificial nails or from the use of medicines or other environmental influences.' (from the brand's website)

The Keratin Nail Restorer, which is the first step of the treatment, is a baby pink-tinged thin gel you apply directly on the nails, and wait for it to absorb/dry before the next step. The Nail Restorer is quite a watery product with a pleasant fresh scent that reminds me of a serum for your nails - it hydrates the nails and strenghtens with the keratin, and it can be reapplied as often as needed on bare nails. In fact, Trind recommends using the Restorer daily, sealing it in with the Protector, and then removing everything and repeating the process the next day, however my favorite way of using the Keratin Nail Restorer was to apply it at bedtime, and then again before doing a weekly manicure.

The second step, the Keratin Nail Protector, is more like your standard nail strenghtener; it aims to seal in the moisture from the Nail Restorer and protect your nails against damage. I've used it both on its own (it goes on clear and gives the nails a nice glossy sheen) and as a base coat for my nail polish.
I've been testing the TRIND Keratin Treatment Kit for two months now, and I'm happy to say that my nails are back to their regular strong selves - no breakage in sight! Since I started using the system, I haven't experienced any new cracks on the sides of my nails, and I've also had less peeling on the tips as well. I can't say that I've noticed my nails getting any thicker, but my nails are naturally quite thick, strong and not very flexible (kind of like claws - you get the picture).

While I can definitely say that the Keratin Nail Protector stops any discoloration or stains from nail polishes, it unfortunately does not protect from mild peeling on the surface on the nails that I always get from wearing glitter nail polishes - but I honestly haven't found anything that does.  In terms of how the Trind kit fares compared to OPI Nail Envy and Nail Tek Hydration Therapy III, my other strenghteners of choice, I feel that the Trind duo keeps my nails more hydrated than both, thus preventing painful breakage. I've used the kit both with Trind Caring Colors as well as nail polishes from other brands, and the results are pretty much the same.
Along the Keratin Treatment, I also received a bottle of Trind's Extra Mild Nail Polish Remover* ($9 for 4.23 fl. oz/ 125 ml). Its gentle formula feels more moisturizing than my regular green OPI nail polish remover and removes cream and shimmer formulas without a problem, but it's definitely not strong enough to tackle glitter, which is expected in an acetone-free formula. While I like this remover, I'm not as impressed with it as with the Keratin Treatment.

All in all, I think the TRIND Keratin Treatment for Nails is a very effective strenghtener, although I do wish the price point wasn't as high - especially as the bottles only contain 0.3 fl. oz/9 ml of product versus the usual 0.5 fl. oz/15 ml. What is your favorite nail treatment? Do you use it as base coat or only wear it on manicure breaks?

*Disclaimer: The products marked with an asterix (*) are press samples I received from the brand's PR for review consideration. All links are non-affiliate. All opinions are 100% honest and unbiased, no matter if the products featured were purchased with my own monies or provided as free press samples. Thank you for reading!

Sunday, June 15, 2014

Trind Caring Color Nail Lacquer Spring/Summer 2014 Collection Review & Swatches

There's a new player on the US nail market: Trind, a Dutch company specializing in nourishing and strenghtening hand and nail care products, as well as a healthy line of nail lacquers called Caring Colors* ($13 each for 0.3 fl oz/9 ml). Today I have a review and swatches of a part of their Spring/Summer 2014 Collection, "Beauty and The Beach" - let's dive in! ... Or should I say, let's take a stroll?
I received three of the six nail polishes from this collection: Surf's Up, Mint Julep and Appletini. These were a lot of fun to play around with, because as you know, I love almost all shades of blue polish, and the green was a new addition to my nail wardrobe. Trind recommends using the Caring Colors in combination with their treatment products for optimum conditioning effect and adhesion, which prolongs the wear of your manicure. I've been using the lacquers in conjunction with the Keratin Treatment for Nails Kit* for the past two weeks, but it's a bit too early to tell; Trind states it takes approximately 4 weeks to see the strenghtening effect (I'll post a separate review of the kit soon!). I can tell however that with the Keratin Nail Protector used as a base, all of the Caring Colors I tested went on smoothly and resisted chips for about a week on my nails.
Surf's Up is a metallic teal; it appears a bit more aqua blue and duochrome in the bottle but swatches as a true shimmery teal - I like it a lot more than I thought I would! I layered two coats for full opacity. Surf's Up painted smoothly without gaps or pooling around the cuticles, and while you can see some brush strokes, as with nearly all metallic finish polishes, I thought it had a great, even formula.
Mint Julep is a neutral medium depth mint blue with a cream finish. It's a beautiful shade that doesn't pull too yellow or green, like some mint shades tend to on my fair, cool skintone. The photo shows two coats (there are some sheerer patches but it's opaque enough for me) was taken on a third day from application - as you can see, there are no chips and nearly no wear on the tips. It's very slightly greener than Essie In The Cab-Ana, but a close dupe overall, and slightly darker and more vibrant than Orly Gumdrop.

Appletini is a midtone apple green with very fine gold shimmer. I wasn't overly fond of the yellow undertones on my skintone (which the artificial lighting in this photo is bringing out even more - compare to the bottle shots above, which were taken in daylight) but my husband and some girlfriends actually quite liked it. It swatches slightly darker than in the bottle and the shimmer is virtually invisible once on the nails.

All three of the Trind polishes I tried applied evenly, had good opacity, dried fast and wore well without chipping. I initially had some qualms about the elongated handle, but in fact the design makes it easy to hold and paint the nails with precision; all of the Caring Colors have a standard slim brush, which for me makes it easier to get an even application on the sides of my nails. From what I've tried so far, I'm curious to see what else Trind has in stock for us - I was quite impressed with the quality of these!
Trind products, including the Spring/Summer 2014 Collection, are now available online in the US at skindirect.com, skinstore.com and ultimatebeautyonline.com.

Disclaimer: The products marked with an asterix (*) are press samples I received from the brand's PR for review consideration. All links are non-affiliate. All opinions are 100% honest and unbiased, no matter if the products featured were purchased with my own monies or provided as free press samples. Thank you for reading!